In this tutorial, I am going to show you how to deploy WordPress to Google Kubernetes Engine using Gitlab CI and Skaffold. Also, I will show you how to use Gitlab CI to deploy WordPress to multiple environments, by simply creating a new branch in your Gitlab project.
WordPress on GKE Series Recap
Previously in this series, in part III, I installed Skaffold and Minikube on my Windows PC. Created skaffold.yaml with a simple default profile using Kustomize as the deployer. Also, I created the Kubernetes deployment template for WordPress and Mysql, created the folder structure for Kustomize which included the environment overlays and kustomize.yaml in each environment layer. And finally, I deployed WordPress to my local Kubernetes cluster using the skaffold dev command.
It worked like a treat. I was able to run WordPress locally and make any changes to my source code and see those changes appear immediately after refreshing a page.
In Part I, I created a GKE cluster in GCP, created a service account to be used by the cluster, linked it to Gitlab CI, and installed a Gitlab Runner using the Gitlab dashboard.
In Part II, I did an initial setup of GitLab CI, created a simple Gitlab pipeline with dynamic environments, and created the docker container that the Gitlab runner uses when doing a build.
Deploying WordPress to GKE with Gitlab
Understanding the Gitlab pipeline in gitlab-ci.yml
Now that I am able to deploy to a local development environment, the next step is to deploy the WordPress application to GKE.
The Gitlab-ci.yml pipeline currently looks like this:
image: "armindocachada/skaffold-and-gcloud"

services:
  - docker:dind

stages:
  - build
  - review
  - production

variables:
  DOMAIN_NAME: example.com
  PRODUCTION_DOMAIN_NAME: example.com

build_review:
  stage: build
  environment:
    name: $CI_COMMIT_REF_NAME
    url: "https://$CI_ENVIRONMENT_SLUG.$DOMAIN_NAME"
    on_stop: stop_review
  script:
    - echo 'build_review'
  only:
    - branches
  except:
    - master


build_production:
  stage: build
  environment:
    name: production
    url: "https://$PRODUCTION_DOMAIN_NAME"
  script:
    - echo 'doing build_production'
  only:
    - master

recreate_review:
  stage: review
  script:
    - echo 'doing recreate_review'
  environment:
    name: $CI_COMMIT_REF_NAME
    url: "https://$CI_ENVIRONMENT_SLUG.$DOMAIN_NAME"
    on_stop: stop_review
  when: manual
  only:
    - branches
  except:
    - master
  dependencies:
  - build_review

deploy_review:
  stage: review
  script:
    - echo 'doing deploy_review'
  environment:
    name: $CI_COMMIT_REF_NAME
    url: "https://$CI_ENVIRONMENT_SLUG.$DOMAIN_NAME"
    on_stop: stop_review
  when: manual
  only:
    - branches
  except:
    - master
  dependencies:
  - build_review

stop_review:
  stage: review
  script:
    - echo 'doing stop_review'
  environment:
    name: $CI_COMMIT_REF_NAME
    url: "https://$CI_ENVIRONMENT_SLUG.$DOMAIN_NAME"
    action: stop
  dependencies:
    - build_review
  when: manual
  except:
    - master

deploy_production:
  stage: production
  script:
    - echo 'doing deploy_production'
  environment:
    name: production
    url: "https://$PRODUCTION_DOMAIN_NAME"
  when: manual
  only:
    - master
  dependencies:
  - build_production
In this Gitlab pipeline, there are three stages:
- build
- review
- production
The build stage is common to all. This is where skaffold should be called to build the required docker images, as configured in skaffold.yaml, and the docker images should be pushed to the Google Container Registry(GCR). To build the docker images, since I am doing it from inside a Gitlab Runner in the Kubernetes cluster, I am going to use Google Cloud Build via Kaniko.
The review stage is only used by any branch that is not the master branch.
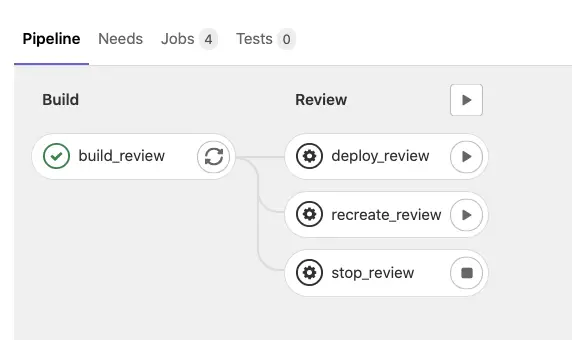
It contains 3 tasks:
- deploy_review
- refresh_review
- stop_review
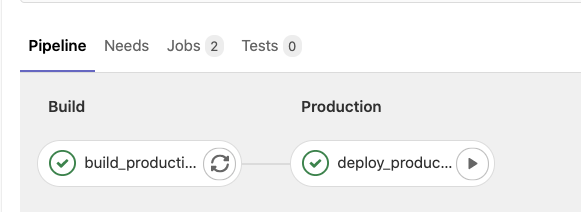
The production stage is only called when code is committed or merged to the master branch.
It only has one task:
Currently, the three tasks are just doing an echo. We are going to implement them in this tutorial. If you want more information on how I created this pipeline, then please read Part II of the series.
What is Kaniko?
Kaniko is a tool to build docker container images from a Dockerfile without requiring the need of a Docker daemon. This makes it ideal to build docker images inside a Kubernetes Cluster. Another added advantage is that Kaniko is able to cache layers in docker builds, which saves time during repeated builds, when there are no changes that affect the execution of a docker build up to a certain layer.
Why Kaniko?
Since I am running the build inside the Kubernetes cluster, it is not possible to start a Docker daemon just for that, because for that to you would need extra privileges. I say not possible, but that is not strictly true. If you really want to do it, you can, but then you will be breaking plenty of Kubernetes security rules on the way.
How to run Kaniko?
It is possible to run Kaniko as a container in the Kubernetes cluster. But since GCP already offers the ability to run Kaniko via the Google Cloud Build, why would I not use it?
To start using Kaniko with Google Cloud Build, simply override the build section in skaffold.yaml to:
build:
    googleCloudBuild:
      kanikoImage: "gcr.io/kaniko-project/executor"
And also since Skaffold needs to connect to the Google Cloud Build API from inside the Kubernetes Cluster, we need to add an extra role to the cluster service account:
gcloud projects add-iam-policy-binding <project_id> --role roles/cloudbuild.builds.builder --member serviceAccount:<service-account-name-sa@<project-id>.iam.gserviceaccount.com
Current Project Files
Let’s have quick recap of the file structure which we ended up in Part III.
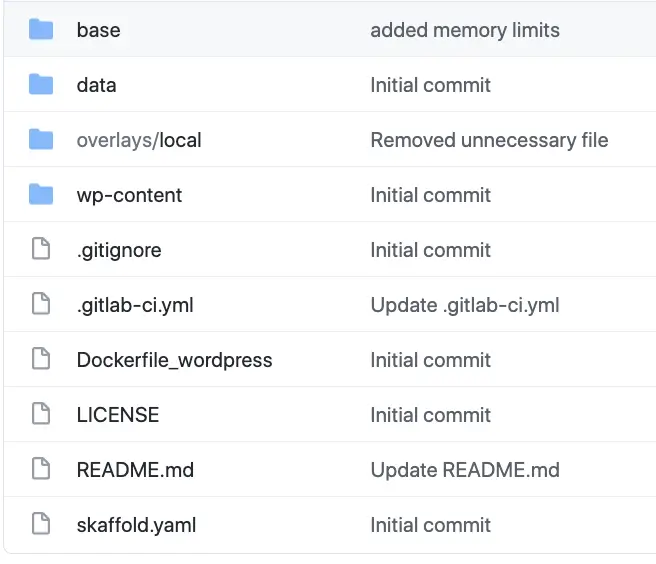
The main files you see in the roof folder are:
- .gitlab-ci.yml — build configuration for gitlab
- Dockerfile_wordpress — Dockerfile that builds wordpress docker image
- skaffold.yaml — Configuration file for Skaffold. This is where we tell Skaffold where our docker files are, which builder to use, what deployer we want and the different profiles that we need.
The folders explained:
- wp-content — this folder contains the source code(PHP) for our wordpress website and any third-party plugins that are needed. This folder will override the wp-content folder that is downloaded by default from the wordpress docker image.
- data — this folder contains uploads(media) that are uploaded via the WordPress dashboard, and a backup of a baseline wordpress database
- base — the base folder contains any Kubernetes deployments YAML that are common to all environments including production.
- overlays/local — This folder contains any overrides/patches/additional objects to the base YAML that is common to all environments.
Adding the review and production profile to skaffold.yaml
The first thing that we are going to do, is to create profiles in Skaffold for review and production . These profiles will differ from the base profile:
- Instead of using docker daemon to build the docker images, we use Kaniko and Google Cloud Build
- Instead of deploying to default namespace in Kubernetes, we deploy to the namespace indicated by GitLab in environment variable KUBE_NAMESPACE
- Instead of using overlays/local for patches, production will use overlays/production, and review will use overlays/review
Why create separate Skaffold profiles?
Typically configuration for a production environment differs from every other environment in crucial ways. For example, in production, we normally use a secure managed database, use a real payments provider, and so on.
Let’s add the new profiles to skaffold.yaml:
profiles:
- name: review
  build:
    googleCloudBuild:
      #projectId: Derived from SKAFFOLD_DEFAULT_REPO variable set in Gitlab CI/CD
      kanikoImage: "gcr.io/kaniko-project/executor"
    artifacts:
    - image: wordpress
      context: .
      kaniko:
          cache: {}
          dockerfile: Dockerfile_wordpress
          buildArgs:
              WORDPRESS_VERSION: "5.6.2"
  deploy:
    kustomize:
        paths:
        - overlays/review
        defaultNamespace: "{{.KUBE_NAMESPACE}}"
- name: production
  build:
    googleCloudBuild:
      #projectId: Derived from SKAFFOLD_DEFAULT_REPO variable set in Gitlab CI/CD
      kanikoImage: "gcr.io/kaniko-project/executor"
    artifacts:
    - image: "wordpress"
      context: .
      kaniko:
          cache: {}
          dockerfile: Dockerfile_wordpress
          buildArgs:
              WORDPRESS_VERSION: "5.6.2"

  deploy:
    kustomize:
        paths:
        - overlays/production
        defaultNamespace: "{{.KUBE_NAMESPACE}}"
When creating a new Skaffold profile, we are extending the base profile. That means it is necessary only to specify what is different.
Creating overlay folders for Kustomize
Let’s configure the production and review overlay folders for kustomize. Since at this stage, review and production are still identical, I am only going to explain the setup for the production overlay.
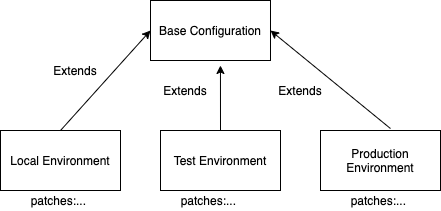
overlays/production
kustomization.yaml
apiVersion: kustomize.config.k8s.io/v1beta1
kind: Kustomization
patches:
  - wordpress-patch.yml
bases:
  - ../../base
The bases attribute is where we specify which configuration layers we inherit from. As the name suggests you can inherit configuration from more than one layer. This can be useful in more complicated environments. But in this case, we only inherit from one folder.
In “patches” we list the YAML files that contain an override to an existing Kubernetes object defined in the parent configuration, “base”. It is important we are overriding an existing object. If we try to create a new kubernetes object, outside of the hierarchy of the base configuration, you will get an error message. If you must define something new, and that is completely valid, it is best to use the resources section. For now we don’t need it.
wordpress-patch.yml
---
apiVersion: apps/v1 # for versions before 1.9.0 use apps/v1beta2
kind: Deployment
metadata:
  name: wordpress
spec:
  template:
    spec:
      containers:
      - image: wordpress
        name: wordpress
        resources:
          requests:
            memory: "128Mi"
            cpu: "100m"
          limits:
            memory: "300Mi"
            cpu: "200m"
In wordpress-patch.yaml we make two overrides.
The first override is to change the docker image name for the wordpress container.
The second override is to ensure that we set an appropriate limit of CPU and memory resources for the WordPress pod. This configuration is important to ensure that a Pod doesn’t eat all the resources. It can happen, especially if a pod is getting a memory leak.
You might think it is better for production to have no limits, but that is not the case. If no resources are requested and limits set, this pod will go higher in the pecking order to be terminated by the kubelet should the Kubernetes cluster ever run out of memory and where auto-scaling (vertical or horizontal) is not an option or perhaps, because it can’t happen fast enough.
Changes to .gitlab-ci.yml — implementing Build stage
The first thing we are going to do is to implement the build_review and build_production tasks for the build stage:
build_review:
  stage: build
  environment:
    name: $CI_COMMIT_REF_NAME
    url: "https://$CI_ENVIRONMENT_SLUG.$DOMAIN_NAME"
    on_stop: stop_review
  script:
    - echo 'doing build_review'
    - mkdir -p build && skaffold build -p review --file-output build/build-state.json
  artifacts:
    paths:
      - build/build-state.json
  only:
    - branches
  except:
    - master
and for production:
build_production:
  stage: build
  environment:
    name: production
    url: "https://$PRODUCTION_DOMAIN_NAME"
  script:
    - echo 'doing build_production'
    - mkdir -p build && skaffold build -p production --file-output build/build-state.json
  artifacts:
    paths:
      - build/build-state.json
  only:
    - master
Things to highlight:
- Locally, to run Skaffold you just have to call “skaffold dev”. That task builds the docker images and pushes them to the local container registry. It then uses Kustomize to deploy the Kubernetes YAMLs to the local Kubernetes. It can also pick up any changes to source code and copy it directly to the containers inside Kubernetes. If you exit the skaffold dev task it also can clean up any artifacts after exit. This is great for a local development environment, but not ideal for CI. So that is why Skaffold offers separate standalone tasks. And that is what we are using.
- We use “skaffold build” to build the docker images and push them to the google container registry(GCR) in GCP
- We save a build artifact called build-state.json. This file is produced by skaffold and holds information about the image tags it created in GCR. We need to use this information at the time of deployment.
- We use separate Skaffold profiles for review and production
Before we commit our changes, we do need to do one more thing. SKAFFOLD_DEFAULT_REPO is a variable that is needed by Skaffold to know which container registry to push our docker images to. So let’s setup that in Gitlab CI.
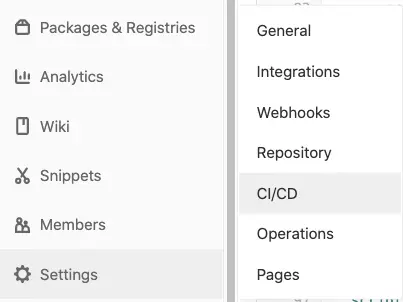
From inside the project in Gitlab, click Settings-CI/CD
Expand the Variables section and create a new variable called SKAFFOLD_DEFAULT_REPO:
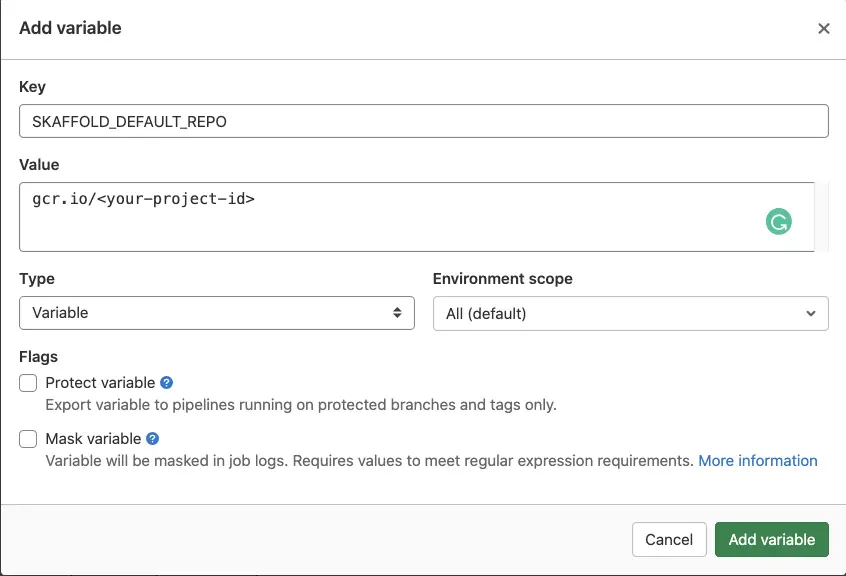
Make sure you untick “Protect variable”, as we want this variable to be available to all branches in Gitlab. A protected variable is normally a variable that you only want to use in restricted environments like production.
Note that the SKAFFOLD_DEFAULT_REPO variable also contains the GCP project id, and Kaniko derives that information from the url itself.
Click Add Variable
Now it is time to try and do a build in the development branch:
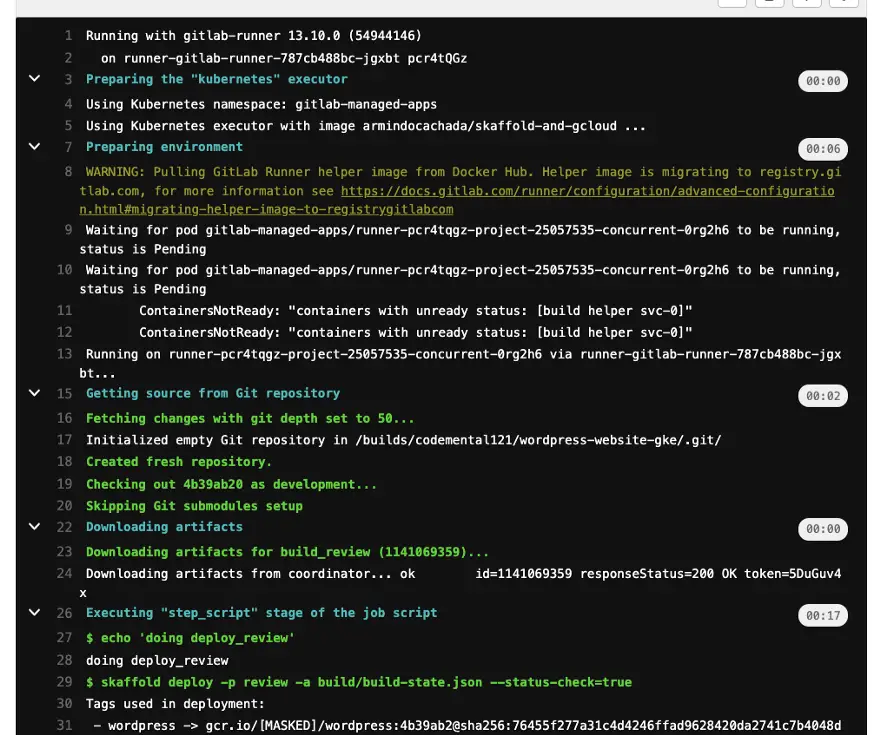
As you can see it worked! Skaffold was able to build our docker images for WordPress and push them to gcr.io.
We have a similar result when merging code from development branch to master:
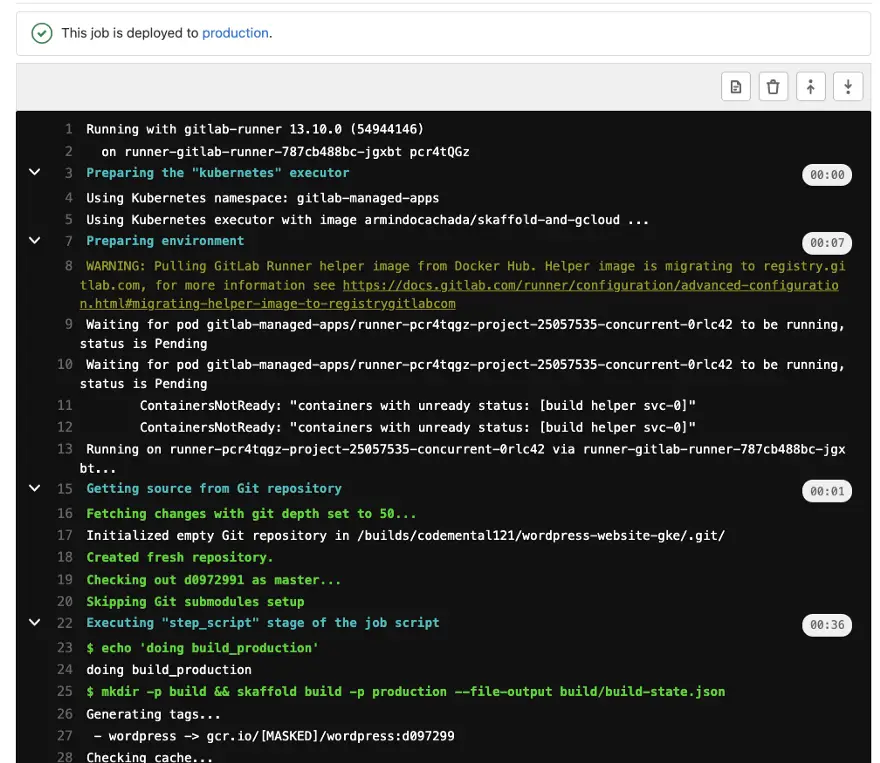
So now that the docker images are ready for our review and production environment, it is time to implement the next phase of the build — The deployment to Kubernetes.
Changes to .gitlab-ci.yml — implementing Deploy stage
deploy_review:
  stage: review
  script:
    - echo 'doing deploy_review'
    - skaffold deploy -p review -a build/build-state.json --status-check=true
  environment:
    name: $CI_COMMIT_REF_NAME
    url: "https://$CI_ENVIRONMENT_SLUG.$DOMAIN_NAME"
    on_stop: stop_review
  only:
    - branches
  except:
    - master
  dependencies:
  - build_review
and for production:
deploy_production:
  stage: production
  script:
    - echo doing deploy_production
    - skaffold deploy -p production -a build/build-state.json --status-check=true
  environment:
    name: production
    url: "https://$PRODUCTION_DOMAIN_NAME"
  when: manual
  only:
    - master
  dependencies:
  - build_production
Things to highlight:
- Skaffold deploy, uses the build-state.json file from. the previous build step to get the correct docker image/tag from GCR. That is why we saved it as an artifact in build stage.
- Skaffold deploy uses kustomize as the deployer. It takes the YAML in kustomize folders as configured for the Skaffold profile and deploys them to Kubernetes inside the namespace indicated by Gitlab by KUBE_NAMESPACE.
- status-check=true means that Skaffold will wait for the deployment to complete as a success before it returns. This is important to ensure that Gitlab knows when the build has failed.
And now let’s run the deploy task for development branch:
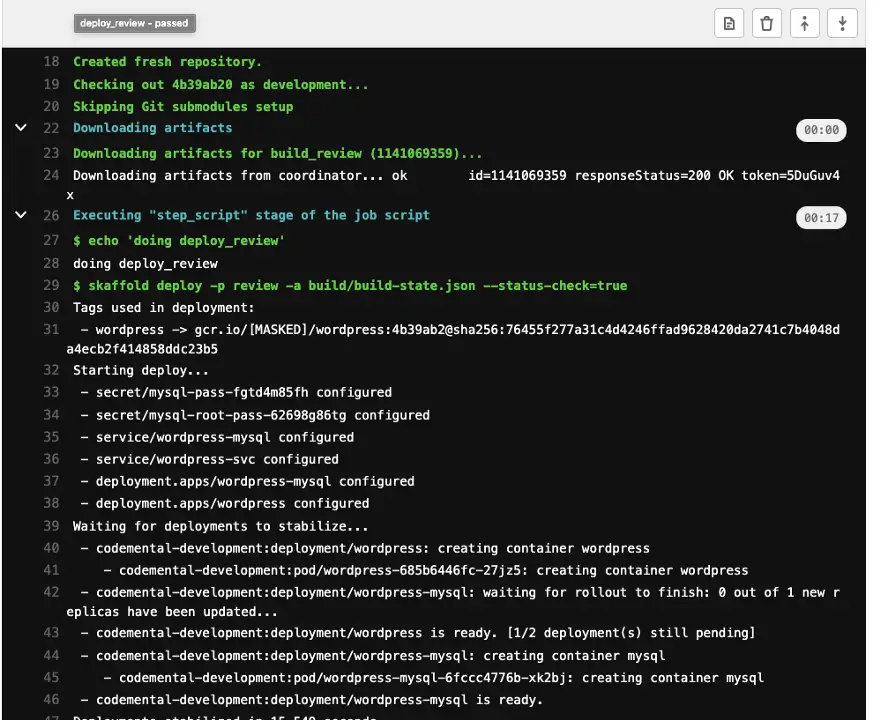
As you can see the deploy has succeeded!
To make sure that everything really worked correctly, let’s take a look inside what is running in our Kubernetes cluster by using kubectl:
$ kubectl get pods -A
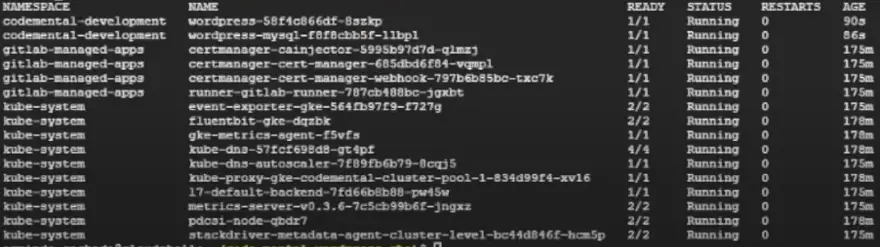
As you can see a namespace called codemental-development was created by Gitlab in our Kubernetes cluster and two pods are running inside it. The wordpress pod and the wordpress-mysql pod! That’s great!
Accessing WordPress inside Kubernetes via a Browser
The next stage will be to create an ingress for our WordPress application, so we can expose it via Nginx ingress. I am not going to do that just yet. That will be in the next article. But nonetheless I want to be able to check that wordpress is working correctly, so for now, as a short term solution, I am going to expose the wordpress service by creating a temporary load balancer which will give us an external IP address to use to connect to the application. It is not the only way, you could also create a Kubernetes service of type NodePort.
How to expose a Kubernetes service using a LoadBalancer
Let’s list the deployments available in our namespace:
$ kubectl get deployments -n codemental-development

We can see that there are two deployments as expected:
- wordpress-mysql — the Mysql Database for wordpress
- wordpress — Wordpress itself running with an Apache docker container
We want to expose wordpress only. We can do that by creating a service of type LoadBalancer:
$ kubectl expose deployment wordpress --type=LoadBalancer --name=wordpress-svc-ext -n codemental-development
> service/wordpress-svc-ext exposed
It will take a couple of minutes for GCP to issue an external IP address for our service.
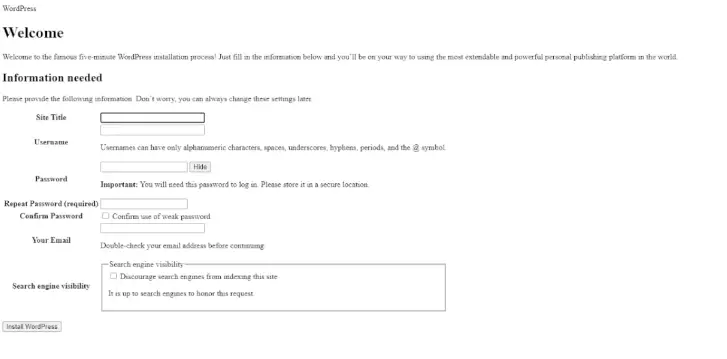
This is how we will be able to access wordpress via the browser:
$ kubectl get svc -n codemental

As you can see a new external IP address was issued!
When accessing worpdress via the browser we can see the installation screen!
And that is it for now. In the next episode of our series, we will setup Nginx ingress and create an ingress for our wordpress site.
You might want to watch the Youtube video for this series as I haven’t been able to cover every single detail in this article. So highly recommend you to watch it as a companion to this article.
Until then, Happy Coding!