In this article I will show you how to setup Gitlab CI/CD to deploy an application to Google Kubernetes Engine, using Skaffold, and dynamic environmments.
If you don’t know Skaffold yet, Skaffold is a command-line tool developed by Google that makes it really easy to setup CI/CD for local, development and production environments with Kubernetes. It handles the full workflow of building and pushing docker containers to the docker container registry, and deploying applications to Kubernetes.
Skaffold doesn’t require any server-side components to be installed in the Kubernetes cluster. All it needs is to have the necessary credentials to access the Kubernetes control plane API server. This is great because it means that you can run Skaffold pretty much from anywhere.
For our setup today we are going to run Skaffold within a docker container inside the GitLab runner.
Creating the build container docker container
In order to perform our build with Gitlab CI and Skaffold, and to be able to access any GCP APIs, we will need a docker container with a pre-install of Skaffold and the Google Cloud SDK.
Dockerfile_skaffold
FROM google/cloud-sdk:alpine

ENV DOCKER_HOST tcp://localhost:2375/
ENV DOCKER_DRIVER overlay

RUN apk upgrade --no-cache \
  # Install common tools
  && apk add --no-cache bash curl wget make git py-pip \
  gcc g++ linux-headers binutils-gold gnupg libstdc++ libgcc ca-certificates tar jq \
  # Install skaffold
  && curl -Lo skaffold https://storage.googleapis.com/skaffold/releases/latest/skaffold-linux-amd64 \
  && mv skaffold /usr/local/bin/ \
  && chmod +x /usr/local/bin/skaffold \
  && skaffold version
And let’s build this docker image:
$ docker build -f Dockerfile_skaffold -t <your-username>/skaffold-and-gcloud .
Sending build context to Docker daemon 12.1MB
Step 1/4 : FROM google/cloud-sdk:alpine
---> 1ca8f710ee45
Step 2/4 : ENV DOCKER_HOST tcp://localhost:2375/
---> Using cache
---> 6cd859bd1d62
Step 3/4 : ENV DOCKER_DRIVER overlay
---> Using cache
---> f3ccc0ba7d3c
Step 4/4 : RUN apk upgrade --no-cache && apk add --no-cache bash curl wget make git py-pip gcc g++ linux-headers binutils-gold gnupg libstdc++ libgcc ca-certificates tar jq && curl -Lo skaffold https://storage.googleapis.com/skaffold/releases/latest/skaffold-linux-amd64 && mv skaffold /usr/local/bin/ && chmod +x /usr/local/bin/skaffold && skaffold version
---> Running in aaddee51df5e
fetch https://dl-cdn.alpinelinux.org/alpine/v3.13/main/x86_64/APKINDEX.tar.gz
...
Gitlab needs access to this docker image, so we need to push the image to a docker repository accessible to Gitlab. It could be the private docker image repository in Gitlab or any other repository which is accessible to GitLab.
docker login
docker push codemental/skaffold-and-gcloud:latest
To make our life easier I published this image to the public docker hub. So in our .gitlab-ci.yml we only need to refer to the image as:
image: "armindocachada/skaffold-and-gcloud"
Creating the .gitlab-ci.yml
In the previous step, we created the docker image that is going to be used by the Gitlab CI runner to execute the build. It is time now to create a simple .gitlab-ci.yml file.
We will be creating dynamic environments based on branch names. As you will see, this is an incredibly powerful feature of Gitlab CI.
The gitlab-ci.yml file is a simplification of what you would do in a more controlled environment.
Any commit to a main branch will directly deploy to production environment. And any commit to a branch different from master will deploy to an environment created for that branch.
Here is how it works, for each branch created, different from the main branch, we will create a new environment for that branch with a unique URL based on that branch name, and execute a two-stage build:
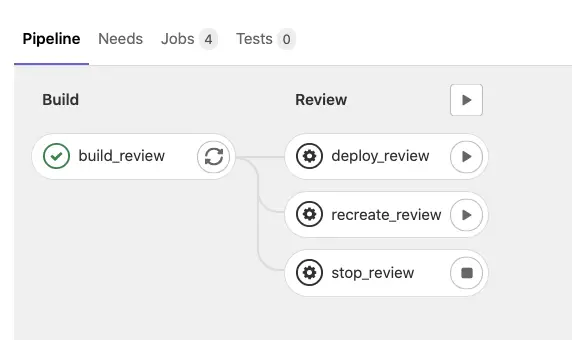
The Build stage creates a docker image with WordPress and pushes it to the Google Container Registry(GCR.io). This will be a private GCR repository that only we have access to.
The review stage, by default, calls deploy_review task, which takes the WordPress docker image created in the previous stage and deploys it as a pod in the Kubernetes cluster, under the environment/namespace assigned by Gitlab to the branch.
recreate_review and stop_review are manual tasks that can recreate the environment from scratch or delete it(stop_review).
Whenever we merge code from a branch to the main branch, we will execute the following pipeline:
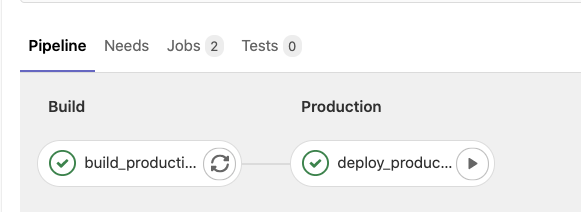
Note the absence of the staging environment. That would be recommended as a separate stage before deploying to production, to ensure the main branch is functional after a merge. I didn’t include it as it would make the demo overly complex.
Here is the .gitlab-ci.yml:
image: "armindocachada/skaffold-and-gcloud"

services:
 - docker:dind

stages:
  - build
  - review
  - production

variables:
  DOMAIN_NAME: example.com
  PRODUCTION_DOMAIN_NAME: example.com

build_review:
  stage: build
  environment:
    name: $CI_COMMIT_REF_NAME
    url: "https://$CI_ENVIRONMENT_SLUG.$DOMAIN_NAME"
    on_stop: stop_review
  script:
    - <do_build>
  only:
    - branches
  except:
    - main

build_production:
  stage: build
  environment:
    name: production
    url: "https://$PRODUCTION_DOMAIN_NAME"
  script:
    - echo 'doing build_production'
  only:
    - main

recreate_review:
  stage: review
  script:
    - echo 'doing recreate_review'
  environment:
    name: $CI_COMMIT_REF_NAME
    url: "https://$CI_ENVIRONMENT_SLUG.$DOMAIN_NAME"
    on_stop: stop_review
  when: manual
  only:
    - branches
  except:
    - main
  dependencies:
  - build_review

deploy_review:
  stage: review
  script:
    - echo 'doing deploy_review'
  environment:
    name: $CI_COMMIT_REF_NAME
    url: "https://$CI_ENVIRONMENT_SLUG.$DOMAIN_NAME"
    on_stop: stop_review
  when: manual
  only:
    - branches
  except:
    - main
  dependencies:
  - build_review

stop_review:
  stage: review
  script:
    - echo 'doing stop_review'
  environment:
    name: $CI_COMMIT_REF_NAME
    url: "https://$CI_ENVIRONMENT_SLUG.$DOMAIN_NAME"
    action: stop
  dependencies:
    - build_review
  when: manual
  except:
    - main

deploy_production:
  stage: production
  script:
    - echo doing deploy_production
  environment:
    name: production
    url: "https://$PRODUCTION_DOMAIN_NAME"
  when: manual
  only:
    - main
  dependencies:
  - build_production
And we stop here for now. In the next article, we will work on creating the Kubernetes deployment template for deploying our WordPress website using Skaffold and Kustomize.