In this article, I am going to show you, how to create a WordPress Kubernetes application using Skaffold and Kustomize so you can start developing for WordPress with Kubernetes, in your local environment straight away.
So What is Skaffold? And Kustomize?
If you don’t know Skaffold yet, Skaffold is a command-line tool developed by Google that makes it really easy to set up CI/CD for local, development and production environments with Kubernetes. It handles the full workflow of building and pushing docker containers to the docker container registry, and deploying applications to Kubernetes.
And what is Kustomize?
Kustomize is a tool in Kubernetes that makes it easy to bundle Kubernetes YAML files in order to deploy Kubernetes applications into distinct environments.
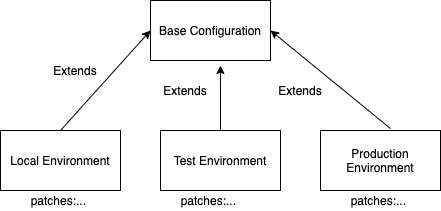
For example, you can create a set of YAML files for local development, and another set of YAML files for the test environment, and another set of YAML files for a production environment, and so on.
And you are probably wondering…. Do we really have to duplicate all the YAMLs for each new environment that we create?
The answer is no! Kustomize promotes configuration re-use by an inherit and patch strategy.
This approach is similar to Object-Oriented Programming, where you can define a parent class and then extend that parent class and then override what you need to change for that specific environment.
Skaffold and Kustomize go hand-in-hand
Yes, Skaffold can deploy a Kubernetes application with Helm or Kubectl without needing Kustomize.
But for me using Kustomize as a deployer is a perfect marriage with Skaffold.
Let’s get started!
Installing Skaffold for Windows, Linux or MacOS
To install Skaffold, follow these instructions: https://skaffold.dev/docs/install/
How to download source code for this tutorial
You can download the source code for this Skaffold tutorial from Github:
Creating Skaffold.yaml
To deploy WordPress with Skaffold you first need to create a skaffold.yaml in the root folder:
apiVersion: skaffold/v2beta12
kind: Config
build:
  artifacts:
  - image: wordpress-example
    context: .
    docker:
      dockerfile: Dockerfile_wordpress
    sync:
      infer:
        - '**/*.php'
        - '**/*.html'
        - '**/*.js'
deploy:
  kustomize:
    paths:
    - overlays/local
Skaffold.yaml is the most important file for Skaffold. With this file we are telling Skaffold:
- Where our docker files are
- What file extensions we want to synchronize automatically after a change, without having to redeploy our Kubernetes application. This is the main power of Skaffold!
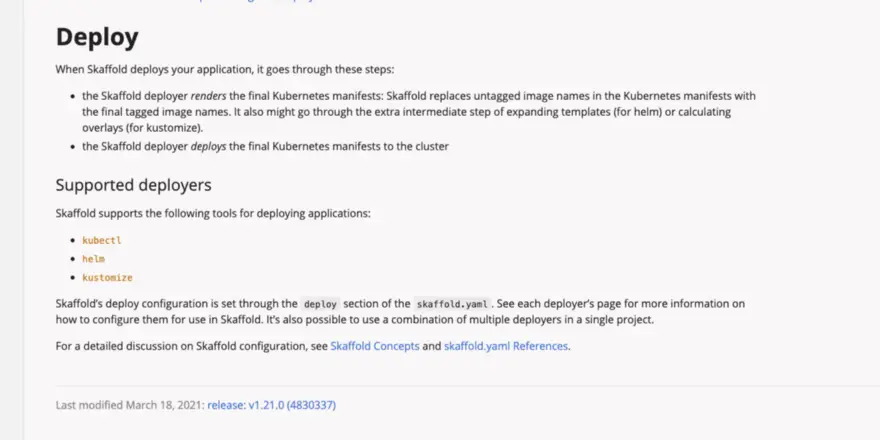
- What deploy tool to use. You can choose one of Helm, Kustomize and Kubectl. In this case we select Kustomize
- Where are the configurations YAML for Kustomize? Which folder to use for the default profile? This is typically the profile that we use for local development.
- Other profiles that we might need. Typically used for CI/CD. This will be configured in the next article of our series when we plugin Skaffold to Gitlab CI.
Creating the Dockerfile for WordPress
To run WordPress in Kubernetes we will use the official WordPress docker image available from the Docker hub with some minor additions like the all important wp-cli tool for WordPress. Also we want to replace whatever default website comes packaged with WordPress, with our own:
Dockerfile_wordpress:
ARG WORDPRESS_VERSION=5.6.2
FROM wordpress:$WORDPRESS_VERSION
ARG WORDPRESS_VERSION

RUN echo "WORDPRESS_VERSION=$WORDPRESS_VERSION"

# install wordpress wp-client. It is rather useful
WORKDIR /tmp
RUN curl https://raw.githubusercontent.com/wp-cli/builds/gh-pages/phar/wp-cli.phar -O
RUN chmod +x wp-cli.phar
RUN mv wp-cli.phar /usr/local/bin/wp

# replace wp-content with our own
RUN rm -fr /usr/src/wordpress/wp-content
COPY wp-content/ /usr/src/wordpress/wp-content/
RUN chown -R www-data:www-data /usr/src/wordpress/wp-content


WORKDIR /var/www/html
Creating the overlays and base folder
To store our Kubernetes YAML file, the Kustomize way, we create two folders in the root project:
- base
- overlays/local
All configuration that is common to all environments will be stored in base/ and each environment will have a folder created inside overlays/:
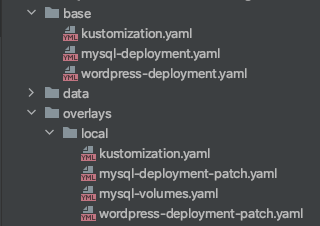
In our case for now we are only concerned about the local development environment, for now.
Each folder will have a kustomization.yaml file. The kustomization.yaml file contains the resources needed to deploy each layer of the configuration. By default Kustomize will look for this file in the folder. If the file does not exist, it will throw an error.
What goes inside kustomization.yaml
base/kustomization.yaml
apiVersion: kustomize.config.k8s.io/v1beta1
kind: Kustomization
secretGenerator:
- name: mysql-pass
  literals:
    - databaseName=wordpress
    - username=wordpress-db-user
    - password=aNotSoSecretPassword
- name: mysql-root-pass
  literals:
  - password=aNotSoSecretRootPassword
resources:
  - wordpress-deployment.yaml
  - mysql-deployment.yaml
And
overlays/local/kustomization.yaml
apiVersion: kustomize.config.k8s.io/v1beta1
kind: Kustomization

patches:
- wordpress-deployment-patch.yaml
- mysql-deployment-patch.yaml

resources:
  - mysql-volumes.yaml

bases:
- ../../base
Inside kustomization.yaml, you can different types of generators like secretGenerator’s, configMapGenerator, and different attributes like resources, patches, bases, etc. More details on what goes inside are available here.
The rule of thumb is if you want to generate any secrets or config for your Kubernetes application, use the generators available to Kustomize.
For any Kubernetes yaml files to include in the configuration layer, use the resources section. This is only for new Kubernetes objects that have not yet been created in the parent layer.
If you need to patch an existing Kubernetes object, use the patches attribute.
The bases attribute is where we specify which configuration layers we inherit from. As the name suggests you can inherit configuration from more than one layer. This can be useful in more complicated environments.
wordpress-deployment.yaml
First we define the service that is going to expose WordPress as a service in Kubernetes of type ClusterIP:
apiVersion: v1
kind: Service
metadata:
  name: wordpress-svc
  labels:
    app: cms
spec:
  ports:
    - port: 80
      targetPort: 80
      protocol: TCP
      name: http
  selector:
    app: wordpress
    tier: frontend
  type: ClusterIP
What is a ClusterIP service in Kubernetes?
A Kubernetes service of type ClusterIP means that the service is only accessible from inside the Kubernetes cluster. This means that only container to container communication is possible.
Why use service of type ClusterIP and not NodePort or LoadBalancer?
We want to expose the WordPress Service to the outside world using an Nginx Ingress when we deploy WordPress on GKE So in this case, a ClusterIP service is the most secure option we can use.
Labels and Selectors
You will have noticed that inside the service spec section, we have defined a selector:
...
spec:
  selector:
      app: wordpress
      tier: frontend
...
Each object in Kubernetes can be assigned a label. A label is a key/value pair, which is intended to identify meaningful attributes of the object that it is attached to. These should be meaningful to us. But for Kubernetes itself, labels are simply used as search queries so that it knows how to make the right connections via selectors.
This selector will help Kubernetes to identify which pods the service will expose. In the YAML above, the selector will apply to any deployment with pods labeled with app=wordpress and tier=wordpress.
The remainder of the configuration for WordPress should be self-explanatory.
Starting Skaffold
Now that all the configuration has been correctly created, let’s execute Skaffold:
First, we start our Kubernetes Cluster:
$ minikube start
😄  minikube v1.13.0 on Darwin 10.15.6
✨  Automatically selected the docker driver
🎉  minikube 1.18.1 is available! Download it: https://github.com/kubernetes/minikube/releases/tag/v1.18.1
💡  To disable this notice, run: 'minikube config set WantUpdateNotification false'
👍  Starting control plane node minikube in cluster minikube
🚜  Pulling base image ...
🔥  Creating docker container (CPUs=2, Memory=8100MB) ...
🐳  Preparing Kubernetes v1.19.0 on Docker 19.03.8 ...
🔎  Verifying Kubernetes components...
🌟  Enabled addons: default-storageclass, storage-provisioner
❗  /usr/local/bin/kubectl is version 1.16.6-beta.0, which may have incompatibilites with Kubernetes 1.19.0.
💡  Want kubectl v1.19.0? Try 'minikube kubectl -- get pods -A'
🏄  Done! kubectl is now configured to use "minikube" by default
And then we can run Skaffold:
$ skaffold dev
Listing files to watch...
 - wordpress-example
WARN[0002] list of file paths deprecated: see https://github.com/kubernetes-sigs/kustomize/blob/master/docs/plugins/builtins.md#patchtransformer
WARN[0002] list of file paths deprecated: see https://github.com/kubernetes-sigs/kustomize/blob/master/docs/plugins/builtins.md#patchtransformer
Generating tags...
 - wordpress-example -> wordpress-example:35120fe-dirty
Checking cache...
 - wordpress-example: Not found. Building
Found [minikube] context, using local docker daemon.
Building [wordpress-example]...
WARN[0003] Skipping wp-content/uploads. Only relative symlinks are supported.
Sending build context to Docker daemon  7.123MB
Step 1/12 : ARG WORDPRESS_VERSION=5.6.2
Step 2/12 : FROM wordpress:$WORDPRESS_VERSION
5.6.2: Pulling from library/wordpress
45b42c59be33: Pulling fs layer
...
d39e54d371f3: Pull complete
Digest: sha256:73cfcbf1e511d760d9fc6c4864aeba1f8c856ba2be333a7d342fd76935055e9d
Status: Downloaded newer image for wordpress:5.6.2
 ---> bbd9ec4bf176
Step 3/12 : ARG WORDPRESS_VERSION
 ---> Running in 1da587342c7b
 ---> a1861a6fa1dc
Step 4/12 : RUN echo "WORDPRESS_VERSION=$WORDPRESS_VERSION"
 ---> Running in 88d7f0147a86
WORDPRESS_VERSION=5.6.2
 ---> c864ceb69846
Step 5/12 : WORKDIR /tmp
 ---> Running in bacb1035d8aa
 ---> 39c6ee3c5456
Step 6/12 : RUN curl https://raw.githubusercontent.com/wp-cli/builds/gh-pages/phar/wp-cli.phar -O
 ---> Running in b6ba3b52cb79
  % Total    % Received % Xferd  Average Speed   Time    Time     Time  Current
                                 Dload  Upload   Total   Spent    Left  Speed
100 5437k  100 5437k    0     0  4125k      0  0:00:01  0:00:01 --:--:-- 4125k
 ---> 366a8437f773
Step 7/12 : RUN chmod +x wp-cli.phar
 ---> Running in 314e501f3a60
 ---> 2a501ae49d7f
Step 8/12 : RUN mv wp-cli.phar /usr/local/bin/wp
 ---> Running in 34b9ee8ec8af
 ---> 64b24df1a38f
Step 9/12 : RUN rm -fr /usr/src/wordpress/wp-content
 ---> Running in b8ccf3f07556
 ---> 8b8ccc879b79
Step 10/12 : COPY wp-content/ /usr/src/wordpress/wp-content/
 ---> 9e1ba82f5936
Step 11/12 : RUN chown -R www-data:www-data /usr/src/wordpress/wp-content
 ---> Running in f30f3e8ff65b
 ---> ca2edce5360c
Step 12/12 : WORKDIR /var/www/html
 ---> Running in 6156018a9377
 ---> e1a10f651d1c
Successfully built e1a10f651d1c
Successfully tagged wordpress-example:35120fe-dirty
Tags used in deployment:
 - wordpress-example -> wordpress-example:e1a10f651d1c77dae1dd539cabcf76432484c3d41f9e0c3c7c65a4f10d7024ef
Starting deploy...
 - secret/mysql-pass-fgtd4m85fh created
 - secret/mysql-root-pass-62698g86tg created
 - service/wordpress-mysql created
 - service/wordpress-svc created
 - deployment.apps/wordpress-mysql created
 - deployment.apps/wordpress created
 - persistentvolumeclaim/mysql-persistent-pvc created
Waiting for deployments to stabilize...
 - deployment/wordpress is ready. [1/2 deployment(s) still pending]
 - deployment/wordpress-mysql: creating container mysql
    - pod/wordpress-mysql-77d8ddf54-8n6kq: creating container mysql
 - deployment/wordpress-mysql is ready.
Deployments stabilized in 36.759 seconds
Press Ctrl+C to exit
[wordpress] WordPress not found in /var/www/html - copying now...
[wordpress] Complete! WordPress has been successfully copied to /var/www/html
....
[wordpress]
[wordpress] AH00558: apache2: Could not reliably determine the server's fully qualified domain name, using 172.18.0.3. Set the 'ServerName' directive globally to suppress this message
[wordpress] AH00558: apache2: Could not reliably determine the server's fully qualified domain name, using 172.18.0.3. Set the 'ServerName' directive globally to suppress this message
[wordpress] [Wed Mar 31 15:18:51.473459 2021] [mpm_prefork:notice] [pid 1] AH00163: Apache/2.4.38 (Debian) PHP/7.4.16 configured -- resuming normal operations
[wordpress] [Wed Mar 31 15:18:51.473592 2021] [core:notice] [pid 1] AH00094: Command line: 'apache2 -D FOREGROUND'
WARN[0081] list of file paths deprecated: see https://github.com/kubernetes-sigs/kustomize/blob/master/docs/plugins/builtins.md#patchtransformer
WARN[0081] list of file paths deprecated: see https://github.com/kubernetes-sigs/kustomize/blob/master/docs/plugins/builtins.md#patchtransformer
Watching for changes...
WARN[0082] list of file paths deprecated: see https://github.com/kubernetes-sigs/kustomize/blob/master/docs/plugins/builtins.md#patchtransformer
WARN[0082] list of file paths deprecated: see https://github.com/kubernetes-sigs/kustomize/blob/master/docs/plugins/builtins.md#patchtransformer
Our Kubernetes WordPress application was deployed correctly. You will see some SQL connection errors at startup, but that’s only because WordPress is trying to connect to the Mysql database, and the database initially is not available. By default in the local development environment, we deploy to the default namespace.
But let’s ensure that the WordPress and MySQL pods are running properly first:
$ kubectl get pods
NAME                              READY   STATUS    RESTARTS   AGE
wordpress-694954759d-85txs        1/1     Running   0          3m54s
wordpress-mysql-77d8ddf54-8n6kq   1/1     Running   0          3m54s
And:
$ kubectl get deployment
NAME              READY   UP-TO-DATE   AVAILABLE   AGE
wordpress         1/1     1            1           7m44s
wordpress-mysql   1/1     1            1           7m44s
To see what Kubernetes services we have available:
kubectl get svc
NAME              TYPE           CLUSTER-IP       EXTERNAL-IP   PORT(S)        AGE
kubernetes        ClusterIP      10.96.0.1        <none>        443/TCP        10m
wordpress-mysql   ClusterIP      None             <none>        3306/TCP       9m24s
wordpress-svc     LoadBalancer   10.110.109.177   <pending>     80:30737/TCP   9m24s
To access the wordpress home page, we need to create a tunnel for our WordPress service.
minikube service wordpress-svc --url
🏃  Starting tunnel for service wordpress-svc.
|-----------|---------------|-------------|------------------------|
| NAMESPACE |     NAME      | TARGET PORT |          URL           |
|-----------|---------------|-------------|------------------------|
| default   | wordpress-svc |             | http://127.0.0.1:52758 |
|-----------|---------------|-------------|------------------------|
http://127.0.0.1:52758
❗  Because you are using a Docker driver on darwin, the terminal needs to be open to run it.
And Voila! We now can access the WordPress Install page.
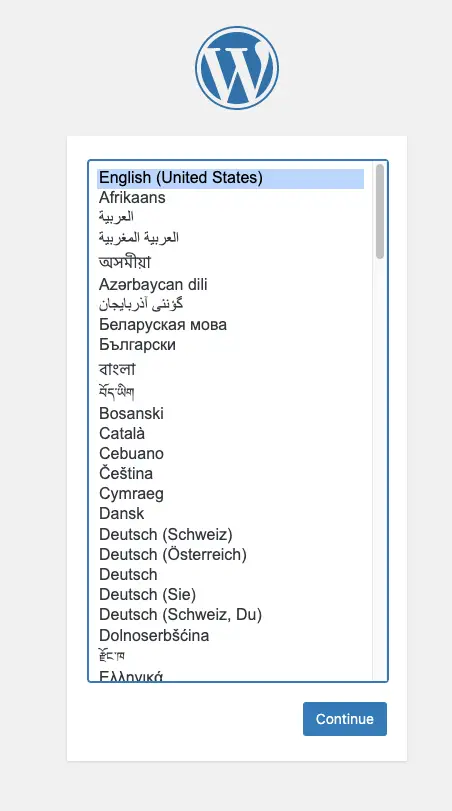
After the install we finally see the WordPress Homepage:
As an exercise try to change locally some PHP file in the wp-content folder and see any changes appear immediately.
I do that test in my latest video.
Hope you found this article useful. In my next article in this series, I am going to be extending Skaffold to deploy a Kubernetes application to Google Kubernetes Engine using Gitlab CI.
Until them, happy coding!