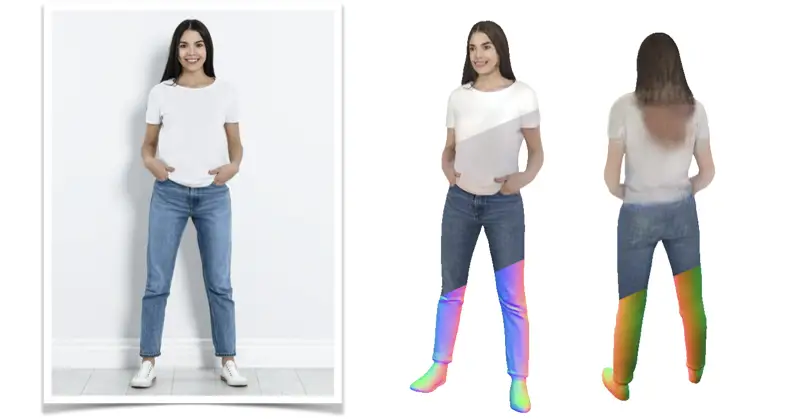
Alldieck et al, Google(2022), PHORHUMGoogle has released a paper on a new state-of-the-art machine learning model, called PHORHUM, that is able to create a 3D model from a single 2D photo, with texture disentangled from the lighting source in the photo.
There is only one bad news. Google hasn’t yet released source code or a demo for anyone to try.
We present an end-to-end trainable system for high quality human digitization — Our method computes, for the first time, albedo and shading information — Our rendering losses significantly improve the visual fidelity of the results — Our results are more accurate and feature more detail than current state-of-the-art
Alldiecket al, Google(2022), PHORHUM
Photogrammetry
Photogrammetry is probably the most well-known method of creating a 3D model from 2D photos. But this method requires multiple photos and a lot of time, computing resources, and additional manual work as the 3D mesh will normally require patching by a 3D Modelling artist. The results are also not guaranteed, as the photos need to be taken in ideal lighting conditions.
If you want to try Photogrammetry, then I recommend you to try Meshroom, which with the aid of a GPU will be able to turn multiple 360 pictures of an object into a 3D model with texture.
3D Deep Learning Research
Creating a 3D model from a 2D photo is the holy grail of 3D modeling. If done by traditional means, creating 3D models of objects can be quite labor-intensive. So everyone is looking for an easier way.
There has been a lot of research and papers in recent times to make it possible to convert 2D photos to 3D at a click of a button.
PHORHUM is another welcome development in the 3D Deep Learning Research. Key to their outstanding results is the use of Pifu, Pixel-ALigned Implicit Functions. Something that was introduced by Sato et al as part of their Pifu paper.
But Google has improved on the original use of Pifu by calculating signed distances, rather than a simple in and out implicit function. More on that later.
How it works
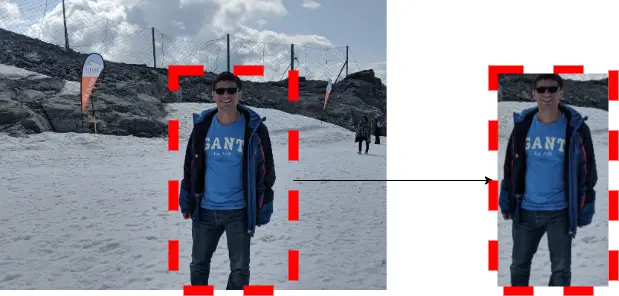
Bounding Box
For inferencing PHORHUM first uses a box detector to create a 2D bounding box around the person in the image.
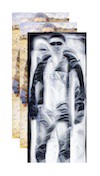
Feature Extraction
A feature extractor is used to reduce the size of the image in the 2D bounding box to smaller more manageable images, which called feature images. A feature image is a filtered version of the original image, with just the core feature it’s looking for.
We can call the set of feature images a feature image vector, or we can call it simply feature map. In the case of PHORHUM there are 256 features calculated for a single image by the feature extractor.
Pixel-Aligned Features
A 3D bounding box is created with a size proportional to the feature image. Let’s call it space S.
For each 3D Point inside this space, let’s call it P, this point is projected on the feature vector in the 2D space using a perspective camera.

From the 2D space the pixels from the feature vector, corresponding to the point P, are stored against point P. Given that our feature vector has 256 features, the point P would then have 256 pixels stored, one pixel for each feature image.
If we repeat this step for all the points in the surface S, then we get F(S). Hence we call it a pixel-aligned feature vector.

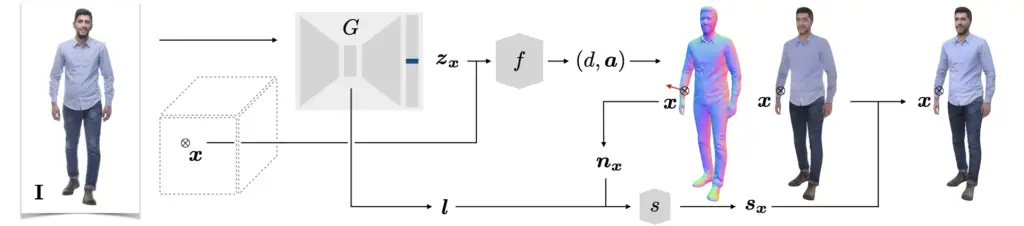
Calculating Distance and Texture
The next step in the inference pipeline is to apply a signed distance function. For each point inside the surface F(S) we calculate the distance d and albedo color a from each point to the closest surface. This results in a signed distance and color field, in the 3D space which we can later use to reconstruct the 3D Geometry and surface texture of the person detected in the image.
Alldieck et al, Google(2022), PHORHUMReconstructing 3D Geometry using Marching Cubes
To reconstruct the 3D geometry of our surface as defined by the signed distance function from the previous step, the Marching Cubes algorithm is then used.
The Marching cubes algorithm is a popular algorithm used in computer graphics to construct a 3D topology from a set of points in the 3D space using a set of triangulation rules. If you want to have a quick understanding on how the marching cubes algorithm works I recommend you to watch the Youtube video below:
Note that, only points that are on the surface of the 3D Human, and within a certain tolerance are considered, i.e. signed distance = 0.
Additionally, the mesh texture is reconstructed using the unshaded/albedo color field calculated in the previous step.
Estimating Lighting Model
To estimate the lighting model we simply need to use the bottleneck of the feature extractor.
What is a bottleneck? A bottleneck of a neural network is simply a neural network without the last fully connected layer.
Calculating Shaded 3D Model
Using the lighting model l as estimated in the previous step and the surface normals of the mesh as reconstructed in step X, a shading network is used to apply the lighting model l to the reconstructed 3D model. The result is a shaded 3D mesh.
You might be asking why would we need to shade the mesh if we already have the albedo colors anyway?
It turns out that having the shading network as part of the pipeline helps during the training of the neural network so that it is able to separate color from ambient light.
Gathering Data
To create the training and test data, Google acquired a total of 217 3D scans of people, from commercial websites.
Using image augmentation techniques, Google researchers created approximately 190,000 variations of images with the rendered 3D humans to 2D in a variety of backgrounds and in a different number of positions, and with different lighting conditions(5 in total).
The drawback of using a small number of 3D assets is that the neural network is biased towards the type of clothing and people included in the 3D scans. Which means that
Loose, oversized, and non-Western clothing items are not well covered by our training set.
Alldiecket al, Google(2022), PHORHUM
Training
When training a neural network to do well its job, we need to guide it towards perfection.
We do that by defining one or more numbers(losses) which tell the neural network if it is getting better or worse results. The idea of providing such a number is that during training, the trainable parameters and weights of a neural network can also be adjusted so that the losses are minimized as much as possible.
Regularization in 3D Deep Learning
Not only losses are needed to help the machine learning model get as close as possible to the intended shape, but losses are also used for regularization. Strictly speaking, regularization is often used by adding a parameter to the loss to avoid overfitting the neural network. But in the more practical sense regularization is used to condition the 3D shape given by the neural network. For example Laplacian Smoothing, is a loss that is often used to avoid jagged surfaces.
Google used a combination of Sparse 3D Supervision and Rendering, for the Geometry and Color losses, to train the neural networks.
What is Sparse 3D Supervision?
Let me just clarify what is meant by Sparse 3D Supervision.
When evaluating the 3D reconstruction of an object from the 2D domain, while training, as mentioned earlier, it is important to signal to the neural network if it is getting closer or farther away from the intended 3D geometry, and in which direction the trainable parameters and weights need to be changed.
This is not very easy to do. But with some clever mathematics, by calculating heuristics based on surface normals and distances, from sampled points, it is possible to get one or more numbers that will inform the neural network whether it is getting closer to the intended geometry.
It is called sparse because we are not using the full information available to us from the geometry. We are simply using some sampled points.
What are the Rendering Losses used for?
Rendering means that a 2D image is taken of a 3D Object with a camera, and a lighting model is applied. In this case, because the neural network needs to learn how to estimate the color without shading, the lighting model used is as uniform as possible.
This rendering is done during training to calculate rendering losses, which further improves the visual quality of the reconstructed 3D model, in addition to the 3D Sparse supervision from the previous step.
However, in the case of PHORHUM, the rendering is not of the full object. Instead, we are only rendering with ray-tracing, small image patches uniformly distributed across the surface of the object. In total 512 image patches are taken, ray-traced, and projected to 2D, onto the feature maps and the rendering losses are thus calculated.
The way that the losses are calculated is not trivial. I recommend you read the PHORHUM paper for the exact details.
Future work
This paper used scanned 3D models of real people, which means it used a very limited data set(217 scans in total).
Augmentation of 3D assets can help to stretch the data a long way, but the limitations are still obvious. There is less diversity on the people and clothes that it can reconstruct.
What if there is a way to use only 2D supervision to train PHORHUM? That means, that suddenly we can use 2D images for training!?
The way to do it is to use a differential renderer.
It turns out that this has been done before, by Nvidia researchers and many others, and luckily I have covered diferential rendering in a previous article:
Sources
Thiemo Alldieck and Mihai Zanfir and Cristian Sminchisescu, Google
Photorealistic Monocular 3D Reconstruction of Humans Wearing Clothing, 2022,
https://phorhum.github.io/static/assets/alldieck2022phorhum.pdf
Shunsuke Saito, Zeng Huang, Ryota Natsume, Shigeo Mor- ishima, Angjoo Kanazawa, and Hao Li.
PIFu: Pixel-aligned implicit function for high-resolution clothed human digitization.