What is Tensorflow Lite?
As the name indicates Tensorflow Lite is the light version of Tensorflow which is design to run on small devices, like mobile phones, tablets, edge devices like the Raspberry PI and etc.
Tensorflow lite is composed of two packages:
- The interpreter: What you normally use when calling TensorFlow lite for inference
- The converter: Tool that converts a TensorFlow model post-training to TensorFlow lite using quantization.
Note that you can’t train models using Tensorflow Lite. You can only convert an existing Tensorflow model to Tensorflow Lite using the TFLite converter.
Tensorflow lite vs Tensorflow
Tensorflow is an end-to-end open-source machine learning platform that includes Tensorflow, the open-source library, Tensorflow.js for running TensorFlow models with Javascript on a browser and on Node.js, and Tensorflow Lite which basically allows running Tensorflow models on a mobile or embedded device.
Normally when referring to Tensorflow, we are really talking about the open-source machine learning library and not the whole platform.
It is possible to run Tensorflow on certain embedded devices, with enough memory and CPU and I have done that with the Raspberry PI 3 and Raspberry PI 4. But you might ask, what is the point of Tensorflow Lite then if we can run Tensorflow on the Raspberry PI?
The problem with running Tensorflow directly on a Raspberry PI is that it takes a long time to load a model to memory(Minutes in the Raspberry PI), leading to a long startup time. Also, it is a lot slower to get a response from a model than what the typical real-world application requires. Also, battery consumption is a real problem, when the mobile device itself is not connected to the mains.
Tensorflow Lite tries to solve all of these issues by optimizing Tensorflow for edge devices. Models are much smaller in size, occupying a much lower memory footprint, and having a much faster startup time than typical Tensorflow models.
More importantly, with Tensorflow Lite there is a faster inference time which can be critical. For example, let’s say you are trying to develop a device to improve cycling safety that uses object detection to alert you when a car is behind you. I am not making that up actually.
Zack Akil used Tensorflow Lite, aRaspberry PI and a Google Coral USB to create such a device.
I haven’t mentioned the Google Coral USB because it is not needed for Tensorflow Lite. It does help though when fast inference times are really important, which clearly is in the case of cycling.
What is a Google Coral USB?
A Google Coral USB is basically a computer chip, called the Edge TPU, that further reduces the inferencing time because it is highly specialized in the type of calculations needed to do inferencing for object detection.
Note that a Tensorflow Lite model doesn’t work out of the box with Google Coral USB. It needs additional modifications. I will definitely cover that in a later article.
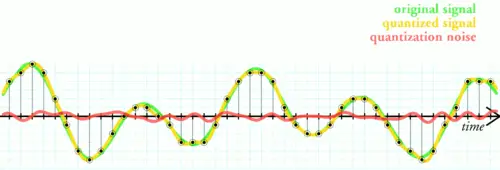
Tensorflow Lite – what is quantization?
The TFLite converter uses quantization to make a Tensorflow model as small as possible in order to make it fit inside mobile devices, but at the same time minimizing the accuracy loss incurred when doing so.
Quantization is not new. Quantization is used in digital signal processing to convert radio sound in analog format to digital format. This process involves converting values from an infinite set of values(continuous values) to a finite set. This means there is always some loss of information. But the idea of the algorithm is to try and minimize it.
How does Tensorflow Lite perform quantization?
One of the steps that TFLite converter performs when quantizing a Tensorflow model, is to convert the model weights and activations from a float 32 bit to an 8-bit integer. Because we are going from a bigger dataset to a smaller dataset, information will inevitably be lost. But the trick is to minimize that loss so that it doesn’t affect too much the accuracy of the model when compared to the non-quantized model.
The idea of quantizing a model is to also make inference faster while reducing the memory footprint.
Tensorflow Lite – Post-training Quantization vs Quantization Aware Training
The TFlite converter uses two main categories of quantization:
- Post-training quantization — done after the model is trained and weights are frozen. Because the weights are not adjusted to compensate for the quantization, there is some loss of accuracy in the model.
- Quantization aware training — Less used, but yields better results as the weights of the model are annotated/marked during training, with information that will help the quantization process to minimize the loss of accuracy of the model, compared to the original model without quantization.
A good analogy is a haircut. A good hairdresser will first mark the areas of your hair where it will cut your hair, to minimize hair loss and maximize beauty. The markers are there to ensure that the hairdresser doesn’t cut hair in the wrong place or the wrong length. This is roughly what quantization-aware training is doing. I know I am oversimplifying, but the truth is that this process is actually quite complex, and difficult to understand. If you really want to know more, I have added some good resources at the bottom of this article.
In general, you will get less loss of accuracy with quantization-aware training than with post-training quantization. However, because quantization-aware training is not trivial, often the easiest and quickest is to just do post-training quantization as a first step.
Can all Tensorflow models be converted to Tensorflow Lite?
The answer is no. Not all operations available in a standard Tensorflow model are available to use in Tensorflow Lite as of now. This means that not all Tensorflow models will be convertible to TensorFlow Lite. As of now TFLite conversion only works for SSD architectures minus EfficientDet. But support for more architectures is coming. I have spotted in the Tensorflow github that experimental support for Tensorflow Lite was added for CenterNet architecture(MobileNet version only).
How to run Tensorflow Lite on the Raspberry PI for Object Detection
In this guide, I will show you how to quickly get up and running with Tensorflow Lite using docker.
Main steps you need to complete:
- Install Docker(Instructions below)
- Install and configure the PI Camera if you haven’t done so yet. See this separate guide I created to install it:
How to Install a Raspberry PI Camera - Download GitHub repository at https://github.com/armindocachada/raspberrypi-docker-tensorflow-opencv.
- Run example
Installing Docker
Installing Docker in the Raspberry PI is very easy. But before you do that, it is always best that you get all the latest updates on your Raspberry PI. So let’s do that first:
Update all your packages in the PI:
$ sudo apt update
...
$ sudo apt upgrade
Get a coffee, because this is going to take a while. When it is all finished, do a reboot:
$ sudo rebootAnd now we are ready to install docker:
$ curl -fsSL get.docker.com -o get-docker.sh && sh get-docker.shAdd your user to the Docker Group
sudo usermod -aG docker $(whoami)And let’s reboot again!
$ sudo rebootAfter reboot, double-check that docker is really installed:
$ docker versionClient: Docker Engine - Community
Version: 19.03.13
API version: 1.40
Go version: go1.13.15
Git commit: 4484c46
Built: Wed Sep 16 17:07:02 2020
OS/Arch: linux/arm
Experimental: falseServer: Docker Engine - Community
Engine:
Version: 19.03.13
API version: 1.40 (minimum version 1.12)
...Installing docker-compose on the Raspberry PI
To get docker-compose up and running we will need python 3 and pip. So let’s install it first:
sudo apt update
sudo apt install python3 python3-pip
Now we can install docker-compose with pip:
pip3 install docker-composeRaspberry PI Camera Setup
In order to try Tensorflow object detection in real-time on the Raspberry PI we need to have a camera installed on the PI. I will assume that you have already done that. If you haven’t, don’t worry I have created a nice guide on how you can install your Raspberry PI Camera:
Raspberry PI Camera Tutorial — How to install a Raspberry PI Camera
Downloading Github Repository
Let’s clone the raspberrypi-docker-tensorflow-opencv repository from inside your home directory:
git clone https://github.com/armindocachada/raspberrypi-docker-tensorflow-opencvStarting the wildlife camera with Tensorflow Lite
To make it really easy for you, I have created a shell script called start-wildlife-camera.sh that will automatically start a docker container with the wildlife camera running. You can configure the objects/labels that will trigger the camera to record. For instance, you might want to detect birds or dogs, or even cats. I have added a default list of objects. Feel free to change.
$ docker-compose -f docker-compose-wildlife-camera.yml up -d
RESOURCES
Running TF2 Detection API Models on mobile
https://github.com/tensorflow/models/blob/master/research/object_detection/g3doc/running_on_mobile_tf2.md
Tensorflow Light – Post Training Quantization
https://www.tensorflow.org/lite/performance/post_training_quantization
Quantization Aware Training — Comprehensive Guide https://www.tensorflow.org/model_optimization/guide/quantization/training_comprehensive_guide
Quantization Aware Training — Example
https://www.tensorflow.org/model_optimization/guide/quantization/training_example
Quantization-aware training — Source Code SNIPPET
https://github.com/tensorflow/model-optimization/blob/v0.5.0/tensorflow_model_optimization/python/core/quantization/keras/quantize.py#L80-L138
Comments
2 responses to “How to run Object Detection with Tensorflow Lite and a Raspberry PI to Build a Wildlife camera”
Hi Mate,
I downloaded your previous docker example and ran through this quickly, the file docker-compose-wildlife-camera.yml appears to be missing from the git repo. I had a look at your git repos to see if it was the wrong link but failed to locate the yml file. Great post and look forward to testing this out.
Hi James,
Thanks for letting me know. I have checked in the files now. I am still adding more documentation to explain how everything works. If you have any questions, don’t hesitate to ask until I manage to complete the documentation.
Kind Regards,
Armindo