Today I wanted to share with you a project that has kept me busy throughout the Christmas holidays. I have been migrating all my websites, which were previously scattered across several servers in GCP and AWS to one single cluster using Google Kubernetes Engine.
My criteria for this project was to reduce costs as much as possible, automate absolutely everything, and serve as a training ground for experimentation with new best practices and new technologies especially Gitops with Terraform and ArgoCD, Helm templates for Kubernetes, and some cost-saving options that are available in the Google Kubernetes Engine, Preemptible and Spot VMs.
Some choices were based on the need to save costs. But at the same time, I didn’t want to become too dependent on the cloud provider, in this case, Google Cloud Platform. Kubernetes helps a great deal in that sense since it is already cloud-agnostic. Every choice I have made in this project was with the intention of keeping costs low but without sacrificing security, incurring any data loss or performance penalty. Also, I made sure I automated every single step of my setup, in case I ever need to move quickly from one cloud provider to the other.
My Git Repository
I am a big fan of Github and Gitlab. Both are very capable cloud providers of Git repositories, and crucial building blocks for any GitOps approach.
I ended up choosing Gitlab because it offers so much for free. Git repositories with up to 10GB of storage per repository, 400 free CI/CD minutes per month, integration with Terraform to store state files, free private container registries and so much more.
One of my key cost-saving measures was to store all my database backups and media in a Git repository using LFS. LFS stands for large file storage and basically, this is a protocol added on top of Git to mitigate some of the issues it has handling versioning of binary files.
Storing backups in Git is not something I would ever recommend to a client. But in my case, my backups are small and I am only dealing with small websites with tiny databases. And this is just for me, for personal use.
Git stores files forever so eventually I will have to cleanse my repository from all the backup files stored over time in the server.
My Git Repository structure
Now let’s briefly discuss the Git repository structure I decided to go with.
I followed the multi-repo approach, which means I have multiple git repositories instead of just one.
I created a single Gitlab Group, with the following git repositories:
- terraform-infrastructure — This project hosts all the terraform code and state that creates all the cloud infrastructure needed, from the GKE cluster, and even the Gitlab variables needed for the CI/CD project to work.
- cluster-management — This project holds all the shared kubernetes services which are installed after the Kubernetes cluster is created. For instance Nginx ingress, ArgoCD, CertManager, Prometheus, etc.
Helmfile is used to install/update the helm templates. Helmfile runs on top of helm and helps combining multiple charts and keeping environment configuration separate from the charts.
Another approach I could have taken is to install an ArgoCD bootstrap via Terraform and then allow ArgoCD to install all the Kubernetes shared services. - kubernetes-templates — holds yaml configuration for ArgoCD and, for each website framework we store here a helm chart. For each website we store a separate values.yaml file.
ArgoCD monitors this Git repository and whenever it sees any template update or a version change, it deploys the change automatically to the Kubernetes cluster. - website repository — Each website has its own git repository with LFS enabled. This means I can store any large binary files in Git without worrying about the repository size getting out of hand. Each time I change this repository I create a tag with a version number using semantic versioning.
Semantic versioning is a very simple system for versioning an application with 3 numbers separated by dots:
– The major release version, normally incremented when there are significant changes to the application
– The minor release version for minor updates
– The patch number for bug fixes or security updates.
The Gitlab CI/CD then builds and pushes a docker image to the Gitlab Container registry, ready to be deployed to Kubernetes.
My Terraform Setup
My Terraform setup only needs an empty GCP project and an existing GCP service account with the required permissions.
My Terraform plan, first of all, enables all the required GCP APIs, it creates a VPC network, the cloud buckets, the GKE cluster with the required node pools, and the Gitlab integration with the new cluster is also configured.
This integration is needed by the Cluster Management project to deploy shared Kubernetes services to the cluster.
Finally, all the required secrets are created and workload identity is set up for any pod that requires access to GCP services.
The Terraform code runs via Gitlab’s CI/CD and the Terraform state is stored using Gitlab’s terraform integration.
Couldn’t be any easier! And all of this is free???
Gitlab Integration with Kubernetes
I need to address here a very sticky point. The preferred Gitlab integration with Kubernetes is changing. Gitlab is moving from a push-based deployment to Kubernetes, to pull-based deployments, i.e. the Gitops way. For that reason, Gitlab has deprecated the existing Kubernetes integration using cluster certificates.
I was willing to use the new Gitlab Kubernetes Agent, but after some investigation, I couldn’t find enough documentation for simple use cases! No mention is made about support for Helm or Kustomize. Since these are fundamental blocks of any modern Kubernetes application, the only possible assumption I can make is that the Kubernetes Agent, is not ready yet.
So I have decided to use a phased approach, which is, for now, to use the deprecated Kubernetes integration for installing cluster-wide applications. And ArgoCD I will use it for pull-based deployments. This is is so that I am ready to completely switch to Gitlab once the Kubernetes Agent is fully featured.
Database
To reduce costs and since my data requirements are light and not critical, I decided that I didn’t need to use the managed database service from Google (Cloud SQL).
But who wants to manage their own database and be responsible for backups?
So I had to come up with an elegant solution for that. I decided to host a Mysql database in Kubernetes and use Kubernetes Cron Jobs to backup the database.
Hosting a database in Kubernetes is highly controversial as it is better suited for stateless containers. And a database is everything but stateless. What could go wrong?
Before creating my own solution I looked into the different MySQL operators available. This a minefield. Plenty of Kubernetes Mysql operators are no longer maintained and actively discouraged to be used in production.
I ended up shortlisting Percona MySQL operator. I tried this operator but I quickly realized that it is too complex and demands more computing resources and memory than what I am willing to pay for. It requires as a minimum to run three separate instances of Mysql in a cluster configuration!
I have prior experience of running Mysql in a cluster configuration and all I can say is that running your own MySql database in cluster mode is the equivalent of owning a white elephant.
So I had to come up with my own simple solution.
What I did was to create a simple Helm chart for MySQL to run as a single container, with a persistent disk and, another Helm chart to initialize and backup databases for each website that needs it. The beauty of it, is that each time I need to add a new website and it needs a database, all I need to create is a values.yaml which contains the name of the database, username, and reference to the secrets for the credentials, Git repository to store the backups, frequency of backups and you are good to go!
Load Balancing and Ingress Controller
Load balancing is a crucial requirement for any application hosted in Kubernetes. Google Kubernetes Engine offers an out-of-the-box ingress controller(GCE).
The ingress controller is very easy to use.
However, for each ingress created using the default ingress controller a separate forwarding rule is added for load balancing. This costs more money.
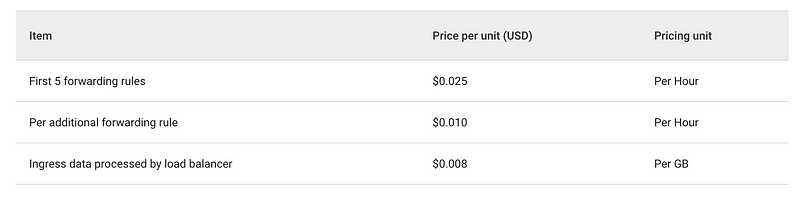
Ok. You get the first 5 forwarding rules for under $20 USD per month, but after that, for each additional forwarding rule, you need to pay $8 USD/month.
For each website, you are hosting that requires external access and an SSL certificate you need to create a separate ingress which will require an additional forwarding rule.
So for my project, I decided to go with the open-source Kubernetes Nginx ingress controller.
This is by far the most popular ingress controller for Kubernetes.
Out of the box when you install it in Kubernetes, the Nginx ingress controller provisions a LoadBalancer with a single forwarding rule and a single public IP address. All the ingresses share the same external IP address.
The best thing about the Kubernetes Nginx ingress controller is that it gives me the power of Nginx without having to run a separate pod for it. Many of the optimizations and configuration options(redirect rules, rewrite rules, etc)that you would have with Nginx alone are available directly from the ingress controller. I love it.
Using Preemptible and Spot VMs for nodes
So I decided to make use of Preemptible and Spot node pools to save some serious money.
What are preemptible node pools?
GKE has the ability to create node pools with preemptible VMs, which cost up to 90% less than the standard price of a full-price worker node. There are two major drawbacks.
A preemptible node can shut down automatically at any point in time. And you can’t use the same VM for more than 24h. It will shut down automatically.
GKE will automatically attempt to provision a new preemptible VM for you. However you have to bear in mind that there might not be enough preemptible VMs available, so your preemptible node pool might end up running dry.
Recently GCP has also added the capability to GKE of creating node pools with Spot VMs.
What are Spot VMs?
Spot VMs have all the advantages in terms of pricing as preemptible VMs but without the limitation of having to shut down every 24h. So in theory you could be making use of a Spot VM for weeks, at 90% discount without a single shutdown. Too good to be true? Maybe…
How to create a GKE Cluster with a node pool with Spot VMs?
I have created both a node pool with Preemptible VMs and another node pool with Spot VMs. I have also created an example Terraform project, available on Github, that creates a cluster with a node pool using Spot VMs and a node pool with Preemptible VMs, since there aren’t any examples that I could find on how to do it with Terraform.
Designing fault-tolerant applications
Because I decided to incorporate preemptible nodes in my design, it was really important that whenever a worker node shutdown, all the essential services continued running without downtime.
All the pods should be able to restart automatically without error and more importantly, without any data loss.
I, therefore, created two node pools.
- The core node pool — which uses standard GKE nodes, which should not experience sudden shutdowns.
- The ephemeral node pool — which uses preemptible or spot nodes that can experience shutdowns.
With affinity rules, I made sure that certain essential services that can’t be replicated, for instance, the database, should only run on the core node pool. The database is core and unfortunately can’t have any more than one replica.
On the other hand, for services that I really don’t mind being unavailable for a couple of minutes, for example, ArgoCD, I used affinity rules so that they run only in the ephemeral node pool.
And services that I don’t mind being unavailable for some time and take large resources, I assign to the ephemeral node pool only.
Other services that can easily run more than one replica are free to roam between the core node pool and the ephemeral node pool.
To minimize downtime I made sure that there are enough replicas so that each node pool is running at least one replica of the service.
Monitoring & Alerts
You are probably waiting for more details on how I am going to monitor all of this.
Even with the best Kubernetes setup in the world, chances are that at some point some pod will fail to restart cleanly or some backup is going to fail.
It is really important in that case to be notified that something out of the ordinary has happened.
I have already set up Prometheus and integrated it with Gitlab as the first step. This gives me some information about the health of my cluster, but it is not enough.
To have a better monitoring & alerts solution in place, I will also be setting up Grafana and AlertManager. Prometheus for metrics, Grafana for visualisation and AlertManager for sending alerts.
That will be a subject of a future article. This will be all for now!
Happy coding!