What if there was a way to automatically translate your videos and communicate with the whole world in over 30 languages? And I am not talking about just subtitles.
There are two recent advances in AI that are bringing us very close to that reality: Google Wavenet and Wav2Lip
Wav2Lip
Is a state of the art AI Machine learning algorithm that is capable of lip-synching a video to any audio containing speech with a high level of accuracy. The way it achieves this is by using Generative Adversarial Networks, also called GANs.
GANs work by making two neural networks compete against each other, the generator which generates fake images, in this case, of fake lip-sync, and the expert discriminator that tries to determine if the generated lip-sync is real or fake.
The discriminator tries to determine a fake by comparing a ground-truth real image against a fake real lip-sync. Confused? Think of the discriminator as an AI algorithm that is trying to look for a deep-fake. The feedback loop of the neural network trying to fool the discriminator, and the discriminator, on the other hand, trying to detect the fake, makes the GAN better over time.
The neural network that is able to fool the discriminator, wins. Both the discriminator and the GAN are trained at the same time. The idea is that over time both the discriminator and the generator will get better at their job over time.
What is novel about Wav2Lip compared to GANs for instance LipGAN, also from the same authors is that the fake lip-sync expert discriminator is trained beforehand and doesn’t get trained over time. It kind of goes against the original concept of GANs, but it seems to get better results.
Google Wavenet
Wavenet, developed by Google and available on the GCP, is also a type of GAN, which generates speech, not images. Wavenet can convert any text to natural-sounding speech. Speech that sounds very much like that of a person and not a robot. It is truly revolutionary and it is quite difficult to tell if it is a real person or not. Using Speech Synthesis Markup Language(SSML) you can further enhance the speech to make it more natural, by adding longer pauses, specifying pronunciation for some non-standard words, acronyms, etc.
Experimenting with Wav2Lip
In order to understand the true capabilities and limits of Wav2Lip, I played with it, over an evening using some sample video clips. I confess that I had a huge amount of fun, and I got truly excited by the things I could do with Wav2Lip. It really required very little effort for me to be able to use it. Credit must be given to the authors who provided some, really easy to run, python code.
This algorithm is capable of generating the lip-synch movements even if the individual is not actually speaking, as you can see in the example below:
See below same video clip but with lip-synching using some audio generated with Google Wavenet. In this case I am speaking Japanese:
The Wav2Lip algorithm itself doesn’t really understand the audio that it is given. It is driven mainly by sound. To see that clearly, I ran Wav2Lip with a random song. You will notice that my lips are not just syncing with the voice, but with the overall sound. The end result is rather strange but slightly amusing.
From doing that experiment it is easy to conclude that if you are trying to generate good lip-synching movement you should first isolate the vocals from any ambient sound. Otherwise you might get some truly bizarre results!
Integrating Wav2Lip with Google Wavenet
It is hard to express how excited I was after experimenting with Wav2Lip. A few months prior I played with the concept of video translation using Google Wavenet, which on its own, it is an amazing development in AI. At the time I had created a python script to translate a video to different languages with voice over, which worked quite well, except that I had no way to match the voice to the lip movement. Now, Wav2Lip has changed everything!
So I decided to work on a small project. I am going to integrate my GCP video translation code, which used the GCP Translation APIs, Google Wavenet, with the Wav2Lip Google Colab notebook. And I am going to make this Google Colab notebook available on a Github repository so anyone can try it for themselves.
I will not explain in detail the GCP/Wavenet code as I do that on my How to create a voice-over in more than 30 languages with the Google Cloud Platform Text To Speech API article.
The original Python code was developed to run inside a docker container. Since Wav2Lip requires an Nvidia GPU, and I don’t have one just yet(Radeon is no good), the easiest is to drop docker and just extend the Google Colab notebook created by the Wav2Lip authors. In this way, I can leverage the NVIDIA GPU that is available via Google Colab
Initial Setup
So I am going to describe the sections I added to the notebook briefly. In order to get the notebook to work you will need to connect it to a GCP project that you will create prior to running the notebook. Please follow the instructions in the How to create a voice-over in more than 30 languages with the Google Cloud Platform Text To Speech API article, which goes step by step on how you can setup a project in GCP to use the Google Translation and Wavenet APIs.
Upload Video and GCP Service Account
To use the notebook you will need to upload your GCP Service account and video that you want to translate first.

Then make sure you update the form above with the paths to the service account and video that you want to translate respectively. Don’t forget to specify the language code of the language you want to translate your video to. For a full list of all the language codes check this link.
Download the Wav2Lip Lip-Synching model
In addition to this, you will need to download the Wav2lip model and upload it to your Google drive. Note that there are two versions available. The first version, the Wav2Lip model is able to generate highly accurate lip-sync, however, the overall resolution is not great. On the other hand, you can also download the Wav2Lip + Gan version which is able to generate a higher resolution video, but, the lip synchronization is slightly inferior. In my case, I used the Wav2Lip+Gan version.
| Model | Description | Download Link |
| Wav2Lip | Highly accurate lip-sync | Link |
| Wav2Lip + GAN | Slightly inferior lip-sync, but better visual quality | Link |
Upload the downloaded model of choice to your Google drive and ensure that it is inside a directory called wav2lip.
Running the Wav2Lip-Wavenet Notebook
Now that we have done all the preliminary steps, it’s time to run all the steps in the notebook.
The first step is particularly important as it checks that we are actually using a notebook instance with an Nvidia GPU.
!nvcc --version

nvcc: NVIDIA (R) Cuda compiler driver
Copyright (c) 2005-2019 NVIDIA Corporation
Built on Sun_Jul_28_19:07:16_PDT_2019
Cuda compilation tools, release 10.1, V10.1.243
Next, run all the steps in the notebook all the way and including the section “Setup GCP Initialisation Variables“. But skip the section “Generate video From Image” for now. This is a bonus feature that you will not need just yet.
Mount your Google Drive
Then you will need to mount your Google Drive. It will require you to authenticate. Just follow those steps and in this way you will be able to upload the Wav2Lip model file to the Google Colab Server. The reason we don’t just upload it directly to the server is that it takes too long.

Then, run all the steps up to the section Transcribe Audio to Text.
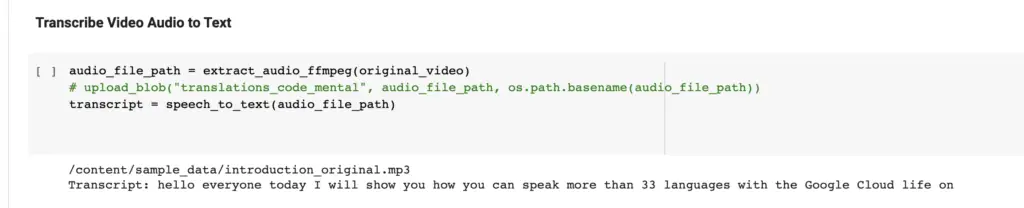
Speech to Text
The section of the notebook “Transcribe Video Audio to Text” extracts the audio from the video you provided using ffmpeg and then converts it to text.
The transcription service is hit and miss so you will need to copy and correct the generated transcript before going to the next step.
Text to Speech
In this section paste into the field transcript, whatever you want to say in the video. To get a list of valid voice names, you can call the list_voices() method to determine the list of voices available for the language code you chose earlier in the notebook. Choose the voice you want to use and type it in the field voice_name. Everything else you can leave as the default.
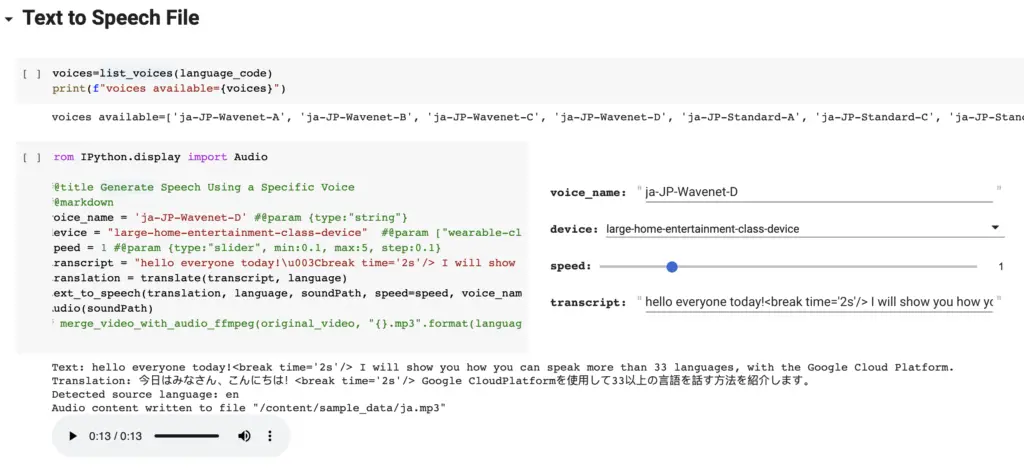
Once you run the Text to Speech step you will be able to listen to the generated speech. If you like the generated speech then you are ready to proceed to the final and most exciting step.
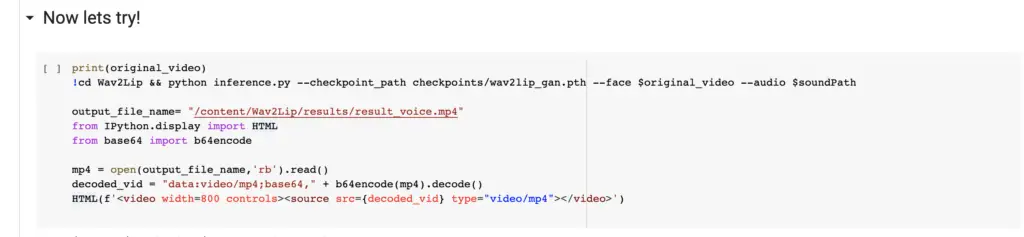
Generating the Video with Wav2Lip
Now you are ready to generate your first video with lip-synch!
See my Youtube video below to see the video I generated using Wav2Lip and also a step-by-step execution of this notebook. Also I explain in this video what the bonus sectio is used for. It is really cool so you don’t want to miss out on that!
Resources
Google Wavenet: https://cloud.google.com/text-to-speech/docs/wavenet
Google Colab notebook: https://github.com/armindocachada/wav2lip-wavenet-colab
Wav2Lip Github: https://github.com/Rudrabha/Wav2Lip
GANs: https://wiki.pathmind.com/generative-adversarial-network-gan