When dealing with training data, you often need to resize images to a fixed size, according to the architecture of the machine learning model that you want to use.
In Tensorflow we can use tf.image.resize() to resize images to different resolutions.
tf.image.resize(
    images,
    size,
    method=ResizeMethod.BILINEAR,
    preserve_aspect_ratio=False,
    antialias=False,
    name=None
)
The method controls the different algorithms that we can use for resizing. You can see a full list of options in the Tensorflow API.
The best way to learn how to use tf.image.resize, is to learn by example. Therefore to learn how to resize images, we are going to use the Mnist dataset. The MNIST dataset is a popular dataset of hand written digits used in educational machine learning projects.
Using Tensorflow its really easy to download this dataset!
Let’s download the dataset and visualise it with Matplotlib:
import tensorflow as tf
import tensorflow_datasets as tfds
from PIL import Image
import PIL
import matplotlib.pyplot as plt

ds = tfds.load('mnist', split='train', shuffle_files=True)
#  create batches of 32 images each
ds_batch = ds.shuffle(1024).batch(32).prefetch(tf.data.AUTOTUNE)

columns = 8
rows = 4

# visualise the first batch
for example in ds_batch.take(1):
  images, label = example["image"], example["label"]
  fig = plt.figure(figsize=(8, 8))

  for i in range(1, columns*rows):
      fig.add_subplot(rows, columns, i)
      # matplotlib.pyplot.imshow doesn't like the
      # alpha channel, so we drop it
      plt.imshow(images[i][:,:,-1])
      # we add a label to each image.
      plt.title(label[i].numpy())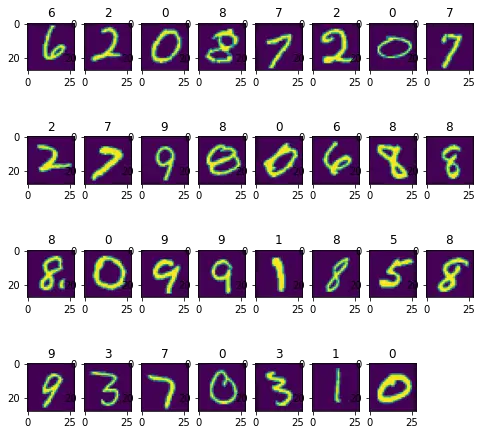
Now we have an idea how what our dataset looks like.
Ignore the fact that for easier visualization we have increased the size of each image and colorized the images when displaying the images using matplotlib. The actual MNIST images are in grayscale and are tiny.
All the images returned by our data set are returned as tensors of shape (28, 28, 1)
# Construct a tf.data.Dataset
ds = tfds.load('mnist', split='train', shuffle_files=True)

for example in ds.take(1):
  image, label = example["image"], example["label"]
  print(image.shape)

  image_pil = tf.keras.utils.array_to_img(image)

# display image in original size
display(image_pil)
(28, 28, 1)
It’s already quite tiny.
Let’s resize the image to half the size
resizedImage = tf.image.resize(image, (14, 14))
resized_image_pil = tf.keras.utils.array_to_img(resizedImage)

resized_image_pil
That’s really tiny now.
Instead of reducing the size, let’s try to increase it.
resizedImage = tf.image.resize(image, (86, 86))
resized_image_pil = tf.keras.utils.array_to_img(resizedImage)

resized_image_pil
Our image is much bigger now!
Note that if we don’t keep the same aspect ratio of the original image, the resized image will be warped.
resizedImage = tf.image.resize(image, (86, 240))
resized_image_pil = tf.keras.utils.array_to_img(resizedImage)

resized_image_pil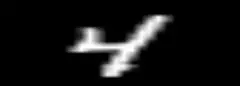
We can prevent distortion by setting the preserve_aspect_ratio parameter to True. But then we will not always have the same width and height.
resizedImage = tf.image.resize(image, (86, 240),preserve_aspect_ratio=True)
resized_image_pil = tf.keras.utils.array_to_img(resizedImage)

resized_image_pil
If we don’t want to distort the images but we still want to fix the width and height, there are other functions that we can use, such as tf.image.crop_and_resize() or tf.image.resize_with_pad.
resizedImage = tf.image.resize_with_pad(image, 86, 240)
resized_image_pil = tf.keras.utils.array_to_img(resizedImage)

resized_image_pil
resizedImage = tf.image.resize_with_crop_or_pad(image, 14, 28)
resized_image_pil = tf.keras.utils.array_to_img(resizedImage)

resized_image_pil
Resources
Recommended Courses for Data Science
- Learn Python for Beginners 👉🏼 Python for Everybody
- Learn Deep Learning with Andrew Ng 👉🏼 Neural Networks and Deep Learning by Andrew Ng
- Learn Data Science with Coursera Plus 👉🏼 Coursera Plus For Data Science