In this article I will show you how you can use the Google Cloud and Text Speech API, and Google Translation APIs to create a voice-over in over 30 languages. And you will be able to see the result in my latest youtube video.
I start this article, with the holy grail for content creators. What if there was a way to automatically translate your videos and create a voice-over in different languages?
Background
I have recently started creating youtube videos and I have come to realise that there is a lot of work that goes into creating and editing an youtube video.
Delivering a smooth performance in front of the camera is part of the challenge. But good video editing and preparing content is one of the major obstacles when providing good content.
It is no wonder, then that internationalisation is down on the list of major concerns. Most of the world speaks English after all. Or so we are led to believe…..
In reality, as much as 60% of Youtube users don’t speak English and even a higher proportion feel more comfortable listening to content in their own language.
As a small Youtube creator as things stand it is too expensive to create content for all these languages. But what if there was an easy way to translate your videos automatically and create a voice-over in different languages?
There is indeed a way to translate all your content automatically using a handful of GCP ML/AI APIs.
As part of a small experiment, I wrote a small script to put all those APIs together and in that way, translate a video to any language supported by GCP(33 languages as of now), with voice-over.
It first transcribes the video using the Speech to Text API and then uses the Google Translation API to translate the text to any language. Finally, we call the Google Text to Speech API to create the voice-over for the video.
Note that I decided not to use the captions generated by Youtube, as I wanted to see what I can get with the captions provided by the Text to Speech API.
Lets get started!
Create a project in your GCP Account
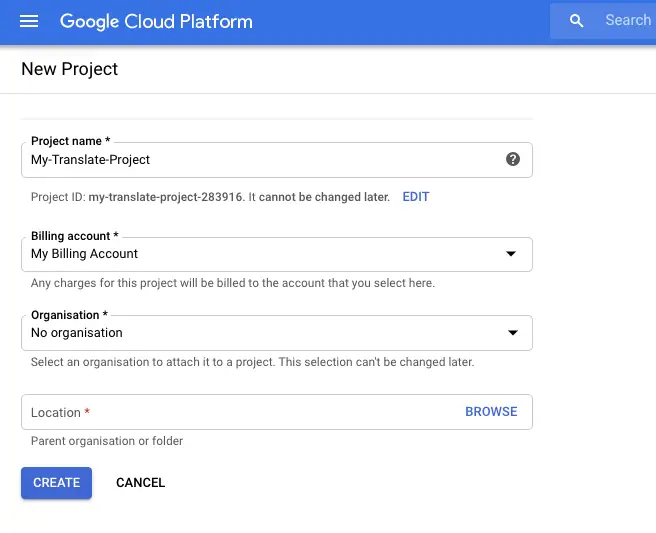
In order to get started you need to create a project in GCP.
Create a Service Account
Navigate to IAM&Admin-Service Accounts.
Click on “Create a Service Account”

Type the name of the service account and click Create.
In the next screen add the roles Project -> Owner and Storage Admin
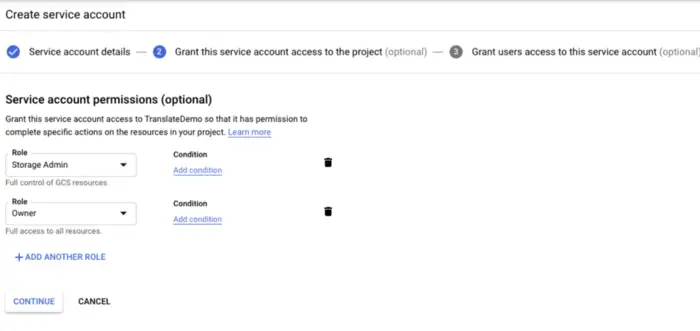
Click Continue and then click Done on the third optional screen.
You will download a JSON file. Keep it in a safe location as we will need it later.
Enabling the required APIs
Now you should enable the three APIs that we will need for this exercise.
Go to API’s and services. Click on Cloud Speech To Text API
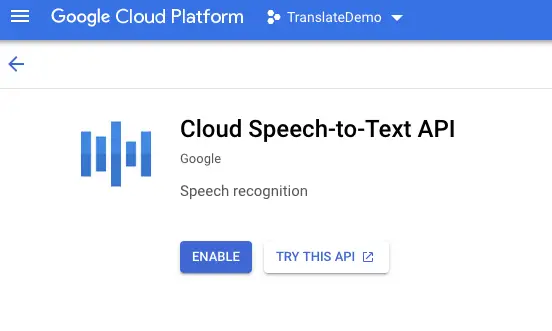
Click Enable.
Repeat for the Cloud Translation API and Cloud Text To Speech API.
The end result is far from perfect. But the potential future of the technology is there to see. With a bit more coding and using some AI to do lip syncing I could have created a perfect voice-over for my video.
Perfect. Now we have enabled the APIs. Let’s get to the fun part.
Development Environment Setup
Dockerfile_translate:
FROM jrottenberg/ffmpeg:3.2.15-centos7

RUN yum update -y && yum install -y python3 && yum install -y python3-pip && pip3 install --upgrade pip

RUN echo "export LANG=en_GB.UTF-8" >> /root/.bashrc

COPY python/requirements.txt /tmp/requirements.txt

RUN pip3 install -r /tmp/requirements.txt
docker-compose.yml
version: "3.7"
services:
  translation:
    build:
      context: .
      dockerfile: Dockerfile_translate
    volumes:
       - .:/app
    entrypoint: ["tail", "-f", "/dev/null"]
We set the entrypoint to tail -f /dev/null to allow the container to stay up and in this way we are able to call our python script.
Now open a terminal window, navigate to the directory with your docker files and start the docker container with:
$ docker-compose up -d
Creating network "translate-video_default" with the default driver
Building translation
Step 1/5 : FROM jrottenberg/ffmpeg:3.2.15-centos7
---> 58b29b349418
Step 2/5 : RUN yum update -y && yum install -y python3 && yum install -y python3-pip && pip3 install --upgrade pip
---> Using cache
---> 6c379e1a2638
Step 3/5 : RUN echo "export LANG=en_GB.UTF-8" >> /root/.bashrc
---> Using cache
---> 6da1d83e6945
Step 4/5 : COPY python/requirements.txt /tmp/requirements.txt
---> 4ac6765a420e
Step 5/5 : RUN pip3 install -r /tmp/requirements.txt
---> Running in 429aa9a64dbf
The Code
Our translate python script will take an input video in mp4 format and an output language and return a new mp4 video with a new audio track with the voice over in the language as requested in the parameter. The script assumes that the input video is in english.
Extracting the Audio from the video
To extract the audio from the video, we use ffmpeg.
def extract_audio_ffmpeg(filePath):
    filePathOutput = os.path.splitext(filePath)[0] + '.mp3'
    subprocess.call(['ffmpeg', '-i', filePath, filePathOutput])
    return filePathOutput
The resulting audio is in mp3 format
Uploading the Audio to Google Cloud Storage
To extract the text we need to use the Google Text To Speech API. But before we can do that, we need to upload the video to Google Cloud Storage.
For that we need to create a bucket in Google Cloud. In the GCP Dashboard, go to Storage->Browser. Click in Create Bucket
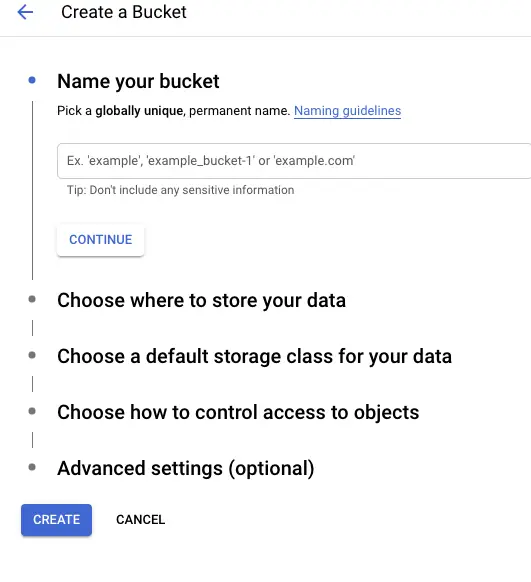
Specify a unique bucket name and click create. You will need this bucket in the code to upload the audio file.
def upload_blob(bucket_name, source_file_name, destination_blob_name):
    """Uploads a file to the bucket."""
    # bucket_name = "your-bucket-name"
    # source_file_name = "local/path/to/file"
    # destination_blob_name = "storage-object-name"

    storage_client = storage.Client()
    bucket = storage_client.bucket(bucket_name)
    blob = bucket.blob(destination_blob_name)

    blob.upload_from_filename(source_file_name)

    print(
        "File {} uploaded to {}.".format(
            source_file_name, destination_blob_name
        )
    )
Calling the Google Speech to Text API
Now that we have the code to upload the audio file, we can call the Google Text To Speech Cloud API.
def speech_to_text(bucket_name, audio_blob_name):
    client = speech_v1p1beta1.SpeechClient()
    # storage_uri = 'gs://cloud-samples-data/speech/brooklyn_bridge.mp3'
    storage_uri = 'gs://' + bucket_name + '/' + audio_blob_name
    # The language of the supplied audio
    language_code = "en-GB"
    # Sample rate in Hertz of the audio data sent
    sample_rate_hertz = 44100

    encoding = enums.RecognitionConfig.AudioEncoding.MP3
    config = {
        "language_code": language_code,
        "sample_rate_hertz": sample_rate_hertz,
        "encoding": encoding,
        "enable_word_time_offsets": True
    }
    audio = {"uri": storage_uri}

    response = client.recognize(config, audio)
    for result in response.results:
        # First alternative is the most probable result
        alternative = result.alternatives[0]
        for word in alternative.words:
            print("Start Time: {}".format(word.start_time))
            print("End Time: {}".format(word.end_time))

        print(u"Transcript: {}".format(alternative.transcript))
    return alternative.transcript
The transcript is returned as a list of results and each result has 1 or more alternatives. Alternatives are provided when the speech engine is not sure of was actually said, so it gives you a few possibilities to select. To simplify and given this is just a proof of concept, I am always selecting the first alternative available.
Calling the Google Translation API
After we have a copy in text of what was actually said in the video, we are ready to translate it into a different language.
def translate(text,language):
    from google.cloud import translate_v2 as translate
    translate_client = translate.Client()

    if isinstance(text, bytes):
        text = text.decode('utf-8')

    # Text can also be a sequence of strings, in which case this method
    # will return a sequence of results for each text.
    result = translate_client.translate(
        text, target_language=language)

    print(u'Text: {}'.format(result['input']))
    print(u'Translation: {}'.format(result['translatedText']))

    print(u'Detected source language: {}'.format(
        result['detectedSourceLanguage'])
    )
    return result['translatedText']
Calling the Google Text To Speech API
Now that we have the translated text, we can use Google’s Text to Speech API to convert it to an MP3 file.
There are a few parameters here that I just want to briefly explain. You can set the speed at which the speaker talks. In my video demo I went with 0.8 to keep up with my own speaking rate. If you are not sure in your case, leave it at 1.0.
You can also set a pitch. The pitch will set the tone of the voice. If you are not sure what exact voice to use, set the gender of the voice. And most important of all, you need to specify the languageCode of the voice you are looking for. The library will then select the best available voice within a list taking into account the parameters given to VoiceSelectionParams.
def text_to_speech(speak, languageCode, outputFilePath, speed=1.0):
    """Synthesizes speech from the input string of text or ssml.
    Note: ssml must be well-formed according to:
        https://www.w3.org/TR/speech-synthesis/
    """
    from google.cloud import texttospeech

    # Instantiates a client
    client = texttospeech.TextToSpeechClient()

    # Set the text input to be synthesized
    synthesis_input = texttospeech.SynthesisInput(text=speak)

    # Build the voice request, select the language code ("en-US") and the ssml
    # voice gender ("neutral")
    voice = texttospeech.VoiceSelectionParams(
        language_code=languageCode, ssml_gender=texttospeech.SsmlVoiceGender.MALE
    )

    # Select the type of audio file you want returned
    audio_config = texttospeech.AudioConfig(
        audio_encoding=texttospeech.AudioEncoding.MP3,
        speaking_rate=speed
    )

    # Perform the text-to-speech request on the text input with the selected
    # voice parameters and audio file type
    response = client.synthesize_speech(
        input=synthesis_input, voice=voice, audio_config=audio_config
    )

    # The response's audio_content is binary.
    with open(outputFilePath, "wb") as out:
        # Write the response to the output file.
        out.write(response.audio_content)
        print('Audio content written to file "{}"'.format(outputFilePath))
Putting everything together
The last piece in our puzzle is to replace the original audio in the video that we passed as input and replace it with the new audio voice over. Thankfully with ffmpeg that is quite easy to do.
def merge_video_with_audio_ffmpeg(videoFilePath,audioFilePath,filePathOutput,start_time_audio="00:00:05"):
    subprocess.call(['ffmpeg', '-i', videoFilePath,
                     '-itsoffset', start_time_audio,
                     '-i', audioFilePath,
                     '-c:v', 'copy',
                     '-map', '0:v:0',
                     '-map', '1:a:0',
                     filePathOutput, '-y'])
And that’s it!
Now the next step is to record a small introductory video and try our script.
Disclaimers, you are not going to get production-level voice-overs at this stage, but hopefully, this demo will give you a taste of the potential of this unprecedented Google technology.
For a detailed step by step instructions, do watch my latest video: