Most people think that AI is difficult, and I am on a journey to prove otherwise. Harnessing the power of AI is not difficult but this is only possible because we can stand on the shoulder of giants and take advantage of all the free open source software available out there.
Background to this story. I recently bought a Xiaomi security camera from GearBest(https://www.gearbest.com/ip-cameras/pp_615275.html?wid=1433363). On its own, this camera is already quite good. It has 1080p resolution and comes with the MiHome app. You can configure the camera using a schedule and when it detects movement it will send a notification to a mobile device. But therein lies the problem. The camera sends you too many alerts and only a small percentage will be because a person was detected. Simple day-to-day noises(such as from a train), or even a housefly will trigger the camera and in turn trigger the alerts. This is not necessarily a bad thing, especially if triggered by sound, as it can be used for a variety of scenarios in the future(e.g. detecting someone knocking on the door). But to be useful in terms of security it needs to only trigger alerts for scenarios which are of real concern. Too many false positives and you end up ignoring the warnings. And if you end up ignoring the warnings, they become useless.
The goal of this experiment is to prove that leveraging the power of AI is easy and also to have a bit of fun and make your home smart and secure without burning hundreds of pounds.
We will create an application with Tensorflow and docker that can be deployed anywhere. This application will add the intelligence needed to a Xiaomi camera for proper security.
What are you waiting for? Buy the camera and click on my Github project to get started.
https://github.com/armindocachada/tensorflow-with-object-recognition
Sources I have used
To be able to build something like a smart camera, you need to stand on the shoulder of giants. Here is a list of sources that inspired me.
Youtube with its many videos teaching tensorflow and openCV.
I followed this series:
Tensorflow Object Detection API Tutorial Part 1 — https://www.youtube.com/watch?v=COlbP62-B-U&t=121s
and
Train an Image Classifier in 3 Minutes — https://www.youtube.com/watch?v=qbFF1r4NGmA&t=14s
Tensorflow Object Detection API
https://github.com/tensorflow/models/tree/master/research/object_detection
Train an Image Classifier in 3 Minutes — Tutorial
https://askmacgyver.com/blog/tutorial/create-image-classifier
This tutorial, alongside the youtube video, helped me getting introduced to image classification with Tensorflow and I used the tensorflow docker instance created by Macgyver as my starting point.
https://askmacgyver.com/blog/tutorial/create-image-classifier
Tools for this project
Tensorflow
Tensorflow is incredibly powerful and comes with pre-built models that are quite capable to detect something as simple as a person. In fact it can do a lot more than that. The code written uses Tensorflow Object Detection API, which is still in ongoing development. https://github.com/tensorflow/models/tree/master/research/object_detection. As a starting point, I used the object detection tutorial python script.
OpenCV
Second tool used is OpenCV. OpenCV (Open Source Computer Vision Library) is an open-source computer vision and machine learning software library. OpenCV Is used to process each frame of the video and apply a Tensorflow model.
Docker
Used to create a container that runs the code for use in any machine that runs docker.
Slack
Slack is a messaging system used by software development teams around the world. It is used to deliver notifications to your mobile without having to write a mobile app.
Python
AI’s language of choice is Python, and Tensorflow was written in Python. No surprise why we need it.
Step 1 — Buy Video Security camera and Memory Stick
Buy a video security camera such as the Xiaomi Mijia Camera. There are many types of security cameras out there. The setup instructions I am providing here only work for Xiaomi Mijia camera, as that is the one that I purchased. In theory, you can buy any camera and as long as you get the camera to save captured videos into a NAS storage, that’s ok. The camera doesn’t come with a memory stick. In order for the NAS share feature to work you need a memory stick. In this case, I recommend 16gb size.
Step 2 — Configure Xiaomi Mijia Camera
Download the MiHome app and set up the camera as per instructions. Plenty of Youtube videos that help you with this. Here is one: https://www.youtube.com/watch?v=QXDv1RsccSs You need to create a NAS share somewhere in your network, to which the camera can upload any videos once motion is detected. In my home, I set up an SMB share on a Raspberry Pi.
Step 3 — Run Docker Container
Once you have the Xiaomi Mijia Camera installed and configured to dump all the videos into a NAS share, you are ready to start the process of setting up the docker container. But you need to install docker first. Don’t know docker? Read this: https://docs.docker.com/get-started/ There are many options where you can run your docker container. For instance, you can run it on a local server in your home(a laptop will work), or you can try to use one of the cloud services providers to host your docker container, for instance on Azure, AWS or the Google Cloud. It will cost you money, but you can spin them up on demand and in this way save money.
- Download my Github project: https://github.com/armindocachada/tensorflow-with-object-recognition
- Build docker container
docker build -t armindocachada/tensorflow-with-object-recognition .3. Start docker container
Pass the -v parameter to share the folder with the docker container in which the camera’s surveillance files will be available. You need read/write access to the folder.
Pass the -p to expose the port to access the jupyter notebook
docker run -i -t -d -p 8888:8888 -v <NAS FOLDER WITH VIDEOS>:/data/videos/incoming armindocachada/tensorflow-with-object-recognition /bin/bashStep 4 — Delivering the notifications
Instead of relying on the Mihome app for receiving notifications it was decided to deliver notification straight to Slack under a specific channel.
To try this demo, you need to create a Slack account and a private channel and generate a security token. Then you need to save this security token into config.ini using the config.ini.template file. Don’t forget to rename it to config.ini, and paste the channel id.
[Slack]
secretToken: a secret token
channelId: a channel id
STEP 5 — Running the intruder detection service
The intruder_detection_service script can be started as a background service from the terminal. Currently the service is not started automatically.
service intruder_detection_service startIt outputs logs to /data/intruder_detection_service.out
The script first tries to download the model file configured and after the download is complete it waits for video files to be uploaded to the ** /data/videos/incoming ** folder. Any processed videos are kept in the same location but a new file is created to mark that the video has been processed.
STEP 6 — Understanding Tensorflow customisations
To better understand the customisations made to the tensorflow object detection demo, lets open a jupyter notebook:
docker exec -it <CONTAINER ID> /bin/bash -c "export COLUMNS=tput cols; export LINES=tput lines; exec bash"
cd /tensorflow/models/research/object_detection
jupyter notebook --allow-root
[W 10:01:22.633 NotebookApp] WARNING: The notebook server is listening on all IP addresses and not using encryption. This is not recommended.
[I 10:01:22.641 NotebookApp] Serving notebooks from local directory: /tensorflow/models/research/object_detection
[I 10:01:22.641 NotebookApp] 0 active kernels
[I 10:01:22.641 NotebookApp] The Jupyter Notebook is running at:
[I 10:01:22.641 NotebookApp] http://[all ip addresses on your system]:8888/?token=633828212cbfe0d0a7a6675beeaf4e8cfa3670bcfc692cf2
[I 10:01:22.641 NotebookApp] Use Control-C to stop this server and shut down all kernels (twice to skip confirmation).
[C 10:01:22.642 NotebookApp]

    Copy/paste this URL into your browser when you connect for the first time,
    to login with a token:
        http://localhost:8888/?token=633828212cbfe0d0a7a6675beeaf4e8cfa3670bcfc692cf2
Copy the url given by the newly started notebook server and open it in a browser.
Now lets take a look at some of the key methods
notifySlack
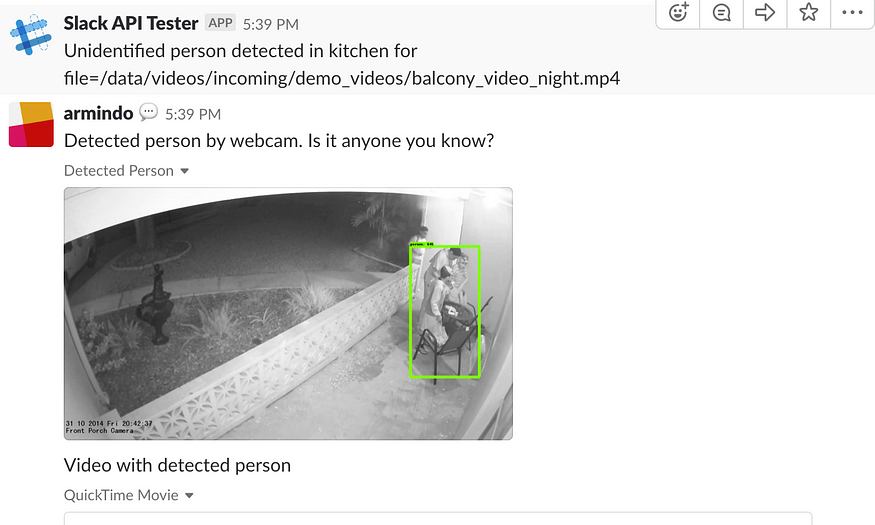
Whenever a person is detected in a video uploaded by the security camera, a method called notifySlack is called. This method uses the slack API to upload the video and an image to allow for quick identification of the security threat in the video. I used slack for speed of development. It comes with built-in security, as I can control the access to the channel to only the people I want to. It comes with a mobile app for android and ios, therefore I don’t have to develop any app to make the notifications work. This is perfectly acceptable for a proof of concept and maybe some limited use at your home.
def notifySlack(plt, image_np):
    plt.imsave("/data/plot.png", image_np)

    sc.api_call(
      "chat.postMessage",
      channel=channel_id,
      text="Unidentified person detected in file={}".format(file)
)
with open('/data/plot.png', 'rb') as f:
        sc.api_call(
            "files.upload",
            channels=channel_id,
            filename='snapshot.png',
            title='Detected Person',
            initial_comment='Detected person by webcam. Is it anyone you know?',
            file=io.BytesIO(f.read())
        )
with open(file, 'rb') as f:
        sc.api_call(
            "files.upload",
            channels=channel_id,
            filename='$file',
            title='Video with detected person',
            initial_comment='Video with detected person',
            file=io.BytesIO(f.read())
        )

The way the object detection works, using the OpenCV library, we take sample video frames from a video file (not every single video frame because the video files have 20 frames per second!), and for each frame captured we call the run_inference_for_single_image(image_np, detection_graph) method. This method returns a dictionary with the results of the inference analysis.
processVideoFile
def processVideoFile(file):
     cap = cv2.VideoCapture(file)
     totalFrameCount = cap.get(cv2.cv.CV_CAP_PROP_FRAME_COUNT)

     if totalFrameCount == 0:
            print "Video file={} not yet ready for processing. Skipping.".format(file)
            return False

     print "Processing video file with {} frames".format( totalFrameCount)

     while True:
        ret, image_np = cap.read()
        currentFrame = cap.get(cv2.cv.CV_CAP_PROP_POS_FRAMES)
        print "Processing frame {} of {} for video file={}".format(currentFrame,totalFrameCount, file)
        if not ret:
            break

      ...

        # skips frames as the rate of the camera is 20 fps
        nextFrame = min(currentFrame + FRAMES_TO_SKIP, totalFrameCount)
        cap.set(cv2.cv.CV_CAP_PROP_POS_FRAMES, nextFrame)
     return True
We use the SSD Inception v2 pre-trained model( ssd_inception_v2_coco_2017_11_17), which already contains common objection detection classes. Don’t underestimate the effort of creating an model from scratch. It takes a lot of training. The easiest is to pick one of the pre-existing models. There are several options available. The right model depends on what type of hardware you have available and the response desired.
detectPerson
The detect person method as the name suggest searches for an object class named person with a detection score above 50%. However you can easily adapt this method to search for other object classes, depending on your purpose. Lets say you are trying to create a smart wildlife smart camera and you want to detect animals such as a very rare Lion. You can modify the method below to only search for the Lion object class. In order to reduce false positives, you can also increase the score from the default value of 0.5 to something higher. From personal experimentation 0.5 worked well for me.
def detectPerson(output_dict, category_index):
    result = False
    classes = output_dict['detection_classes']
    for i in range(len(classes)):
        score = output_dict['detection_scores'][i]
        label = category_index.get(classes[i])
        if (score>0.5 and label['name'] == 'person' ):
            result = True
            break

    return result
If you can’t wait until my next article in this series, why not subscribe to my Youtube Channel and see how I am getting on with this build? What are you waiting for?